Recent Posts

How To Fix a Damaged or Scratched Vinyl Record


If you’ve managed to damage one of your prized possessions or you’ve found out after purchasing a second-hand record that it’s flawed in some way, then you’re probably wondering if there’s any way to salvage it.

Depending on the type of damage, and also the gravity, there may be a way to recover it, at least partially.

There are many ways in which a record can get damaged, but the most common is scratching.

To fix a scratched record, first clean the record to remove any surface dirt. Once clean, locate the scratch and using a USB microscope to see the grooves, gently retrace the grooves with a very fine toothpick or needle. Clean the record surface again and then listen back to the record.

In this article we’ll detail the specific steps you can take to repair a scratched record, as well as looking at the various other ways a record can become damaged, and where there are fixes for these problems we look at what they are.

A badly scratched record

Laying the Foundations: Busting Some Myths and Being Sensible

There is a lot of information online about how to fix a damaged or broken record. Some of it is very good and highly informative, but a lot of it is misleading and/or plain wrong.

The first thing to establish is that it isn’t always possible to fix a damaged or broken record. A lot of the time, a record will be damaged beyond repair, even if the damage appears to be minor or superficial.

It’s always worth keeping this in mind, especially when you encounter advice that states you can use sandpaper, glue and various other materials to fix records.

The impact using these kinds of products can have isn’t just on your records which, while already damaged in the first place, could come off a whole lot worse after being sandpapered, glued or mistreated in any number of ways.

It’s the impact this kind of approach can have on your equipment that is especially problematic. Specifically, the stylus of your turntable will be put at risk if you start playing records that have had their surface rubbed or coated with any substance that isn’t a specialized record-cleaning solution. 

In this article we’ll cover the frequent types of damage you’re likely to encounter on a vinyl record, and we’ll look at sensible solutions that offer the most realistic possibility for helping you to recover your record and keep using it.

Types of Damage You’re Likely to Encounter on a Vinyl Record

These are the most common kinds of problems that affect records.

Record Scratches

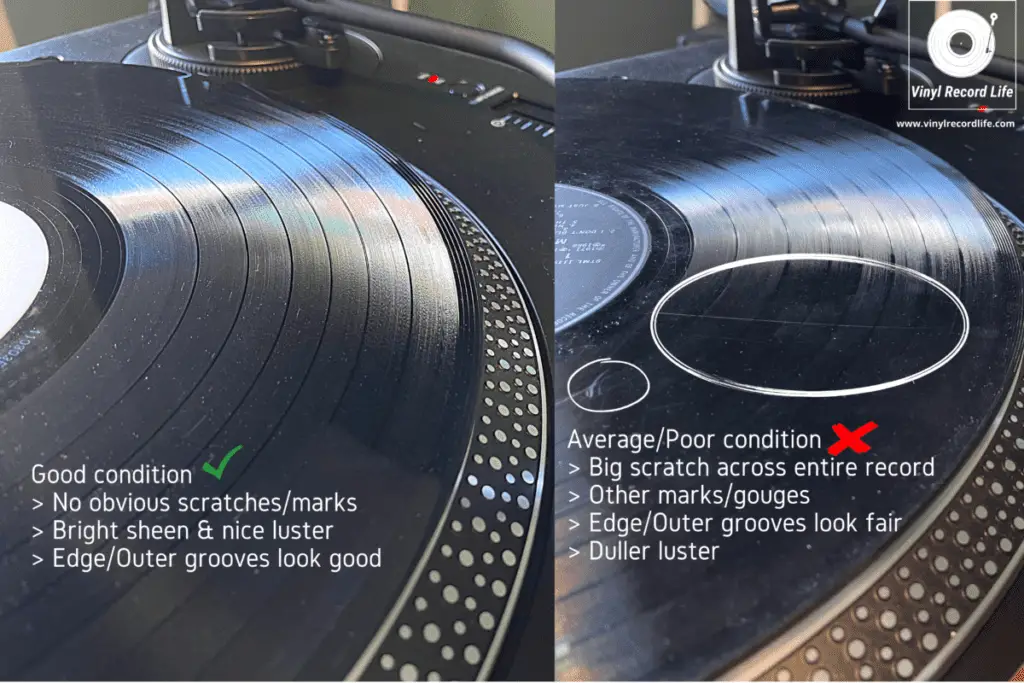
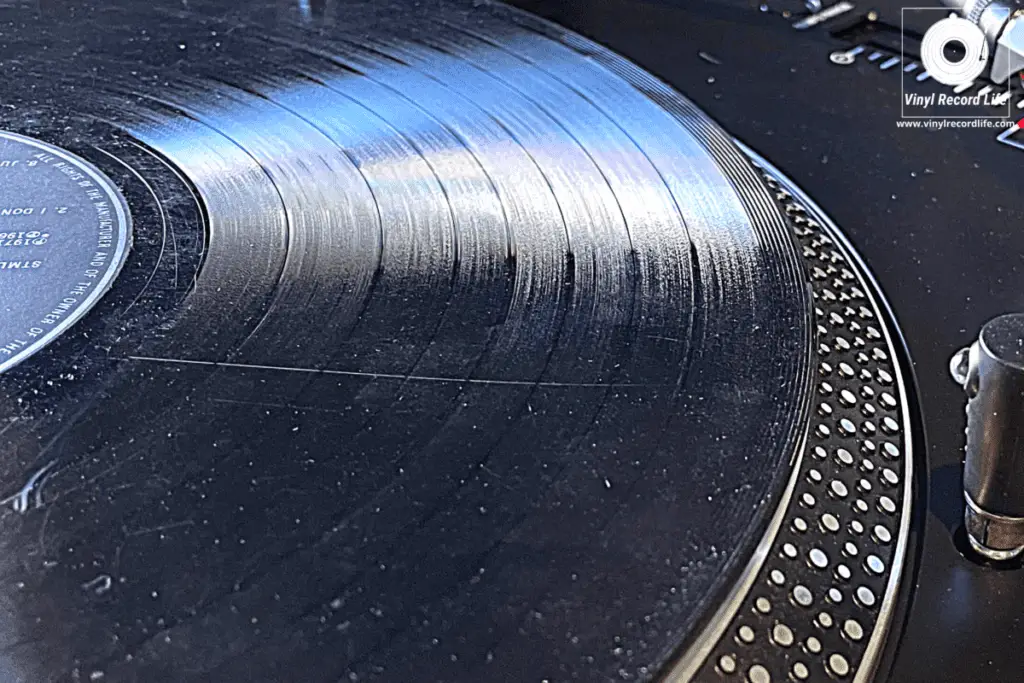
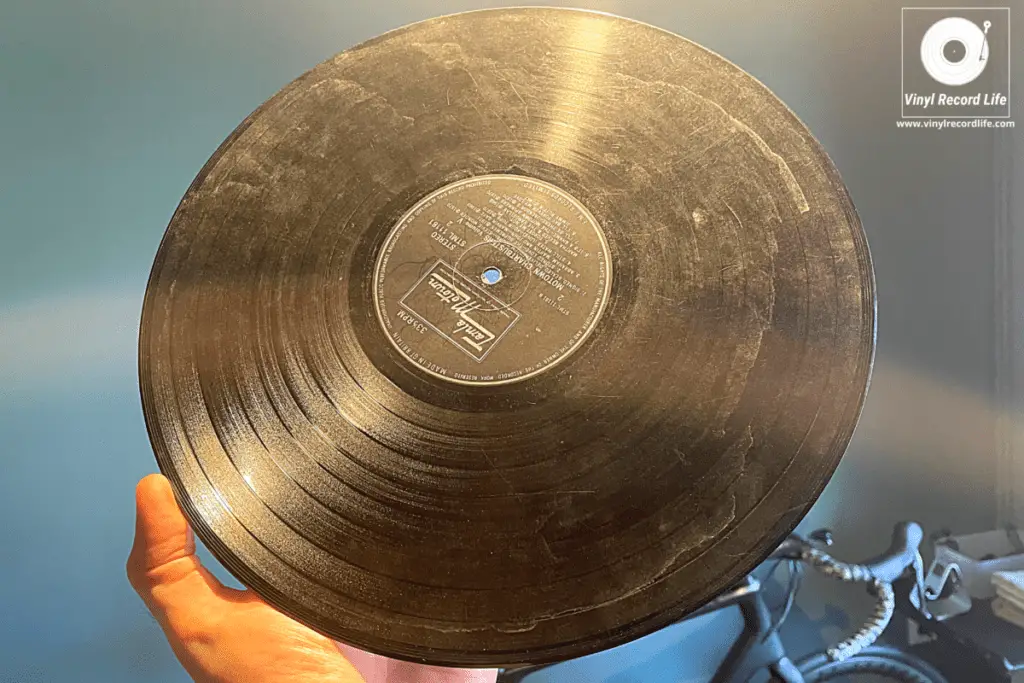
A scratch, or scratches, are the curse of most record collectors and nearly every record I own has at least a few micro scratches.

The material with which records are made, the sheer expanse of the playing surface, and the many environmental factors (dirt, dust, just to name a couple) that a record faces all add up to make it almost inevitable that a record will get scratched in some way.

Often, a record has micro scratches that have no impact at all on the sound quality or on the stylus of your record player, but there are serious scratches too, ones that will greatly impact the sound and also your playing equipment.

Because scratches are the most common kind of damage, we’ll focus on this area further down the article.
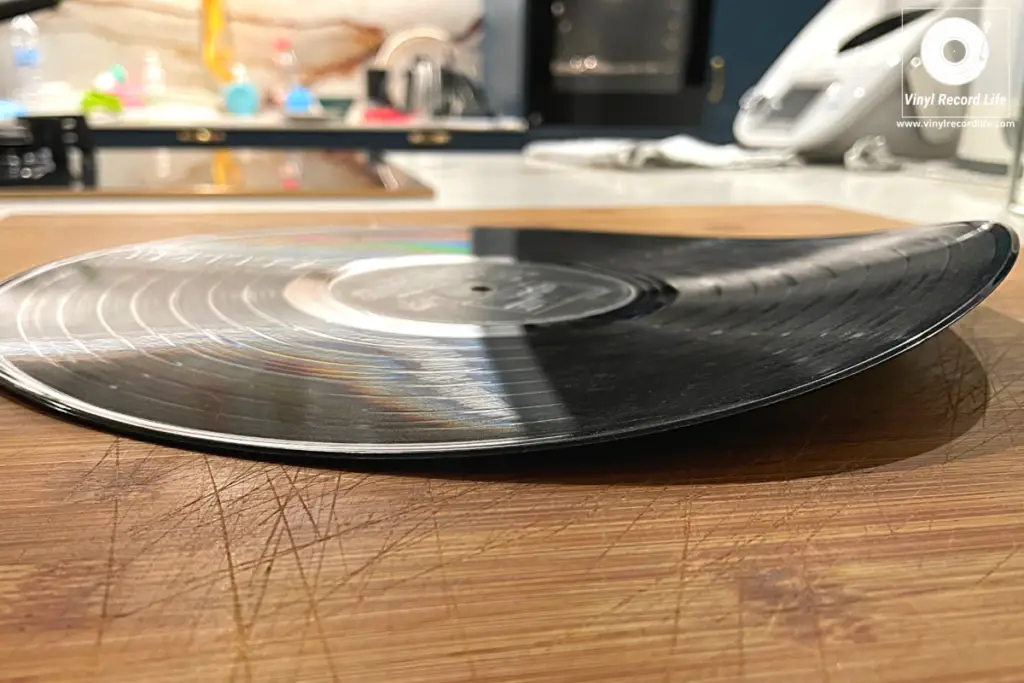
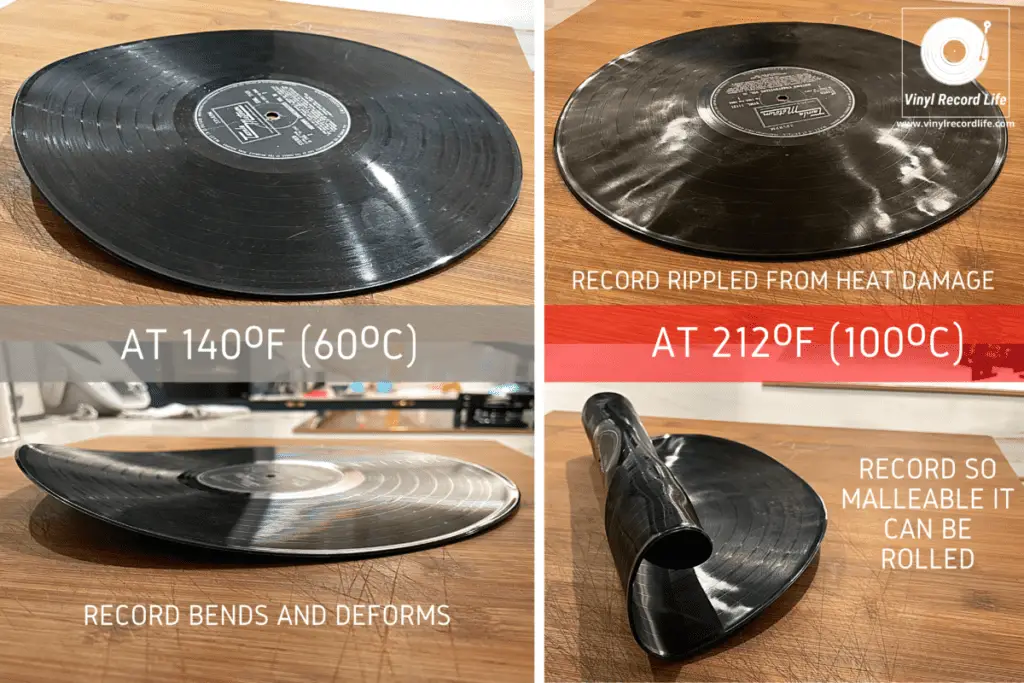
Record Warping

A warp is another fairly regular occurrence with records, and it can easily happen due to a number of factors.

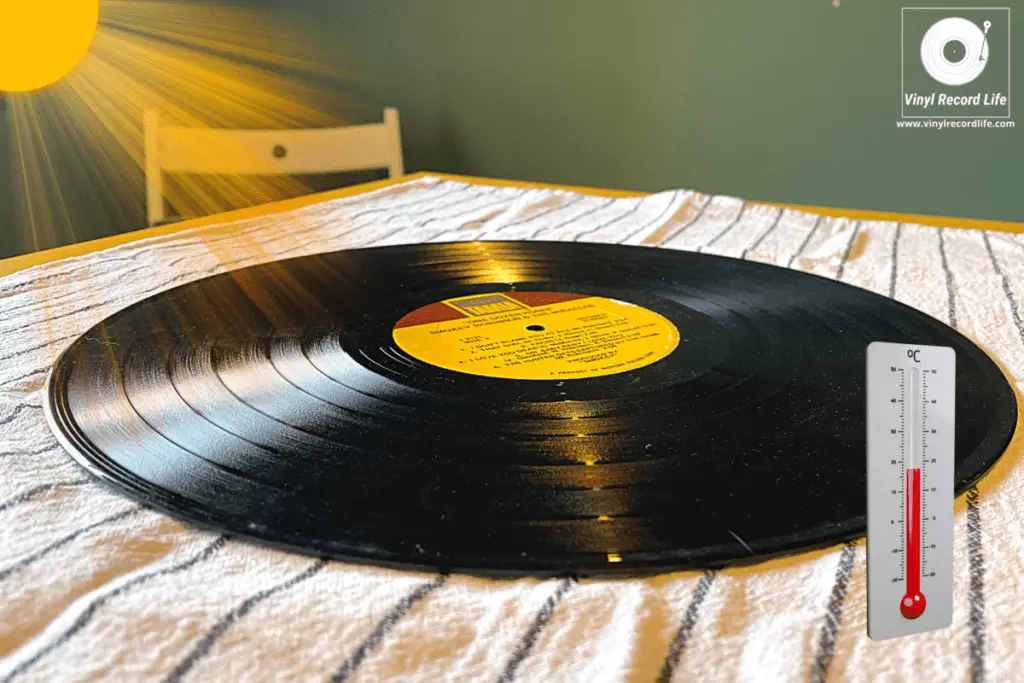
Heat, not ideal storage conditions, weight or pressure on the records and a few other things can lead to a warped record, which is simply when a record gets misshapen.

You can read more on warped records, the causes and solutions here.

Cracks in a Record

A crack in a record is really bad news, and is often caused by the record being dropped or poorly stored, and subsequently having pressure applied in a way that will cause damage or cracking.

Vinyl records are delicate but they are also robust, however like everything they have their limits.

To be honest, I’ve only ever experienced a cracked record twice. If you’re careful with your records then a crack is something you’re likely to encounter only a handful of times, if at all.

Moldy Records

Mold and humidity damage on a record will only happen if records are stored in conditions that don’t meet the most basic of good practice record storage requirements.

A dry environment where the temperature and humidity are well regulated will help prevent mold damage.

Mold on a record will slowly destroy the disc, but what’s worse and more immediate is the damage it’ll potentially cause to the stylus on your turntable.

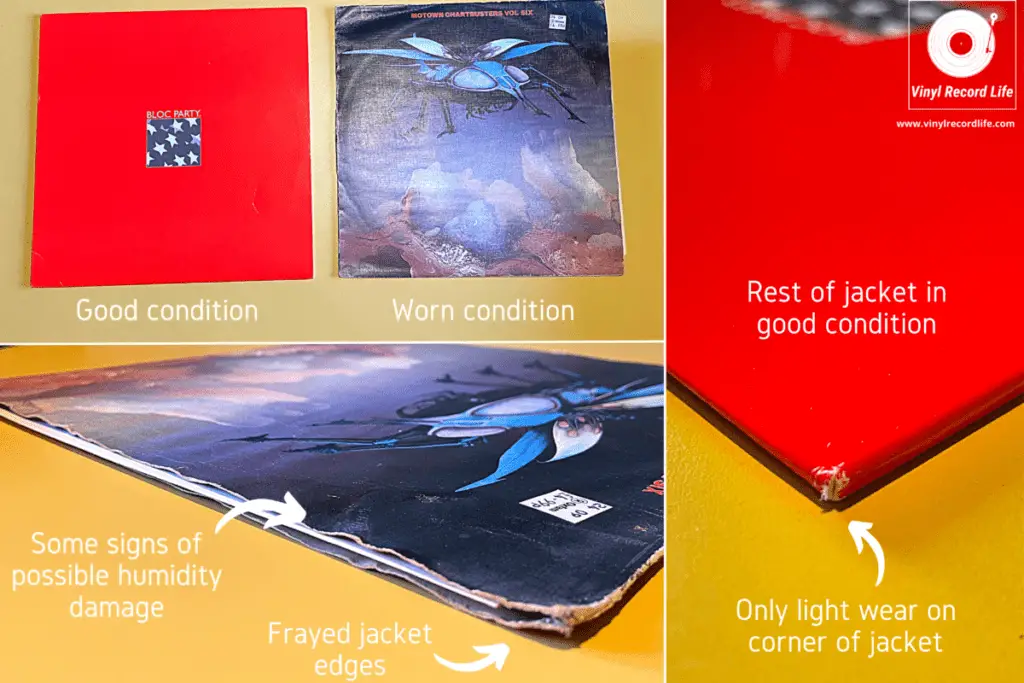
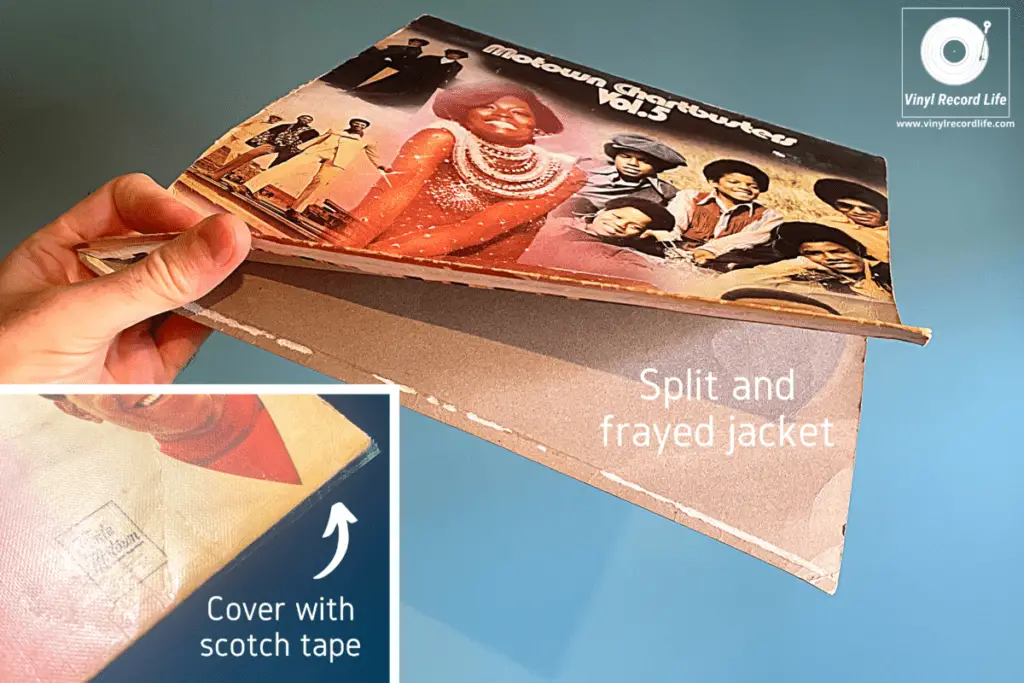
Superficial Damage to Record Covers

This isn’t one that directly affects the sound quality of the record or your ability to enjoy the music, but damage to record covers can lead to other problems further down the line.

Covers protect your records, so they need to be well taken care of. An outer jacket which is damaged and falling apart won’t do a great job of keeping your record safe, and if you’re using an inner sleeve that’s tatty and old, that will also have a detrimental effect.

Record jackets should at least be properly sealed around all but one side, to ensure the record stays in the jacket. 

Sometimes it’s impossible to ensure they don’t get worn, especially if you’ve bought the record second hand, but keeping them in good condition is important. The same for inner sleeves and outer sleeves.

Can Vinyl Records That Have Been Damaged Be Repaired?

Not all records that have been damaged can be repaired. Warped records can often be flattened, and some scratches can be partially repaired, while jackets can be taped. But there is some damage to records that is irreparable.

Essentially, the possibility of repair depends on the type of damage and the extent of it. Often, an attempt at repair should be seen as a bit of an optimistic last resort, because there are never any guarantees and you could end up doing more damage to the record and your turntable stylus.

Here, we’ll now look at how each type of damage listed above can be tackled.

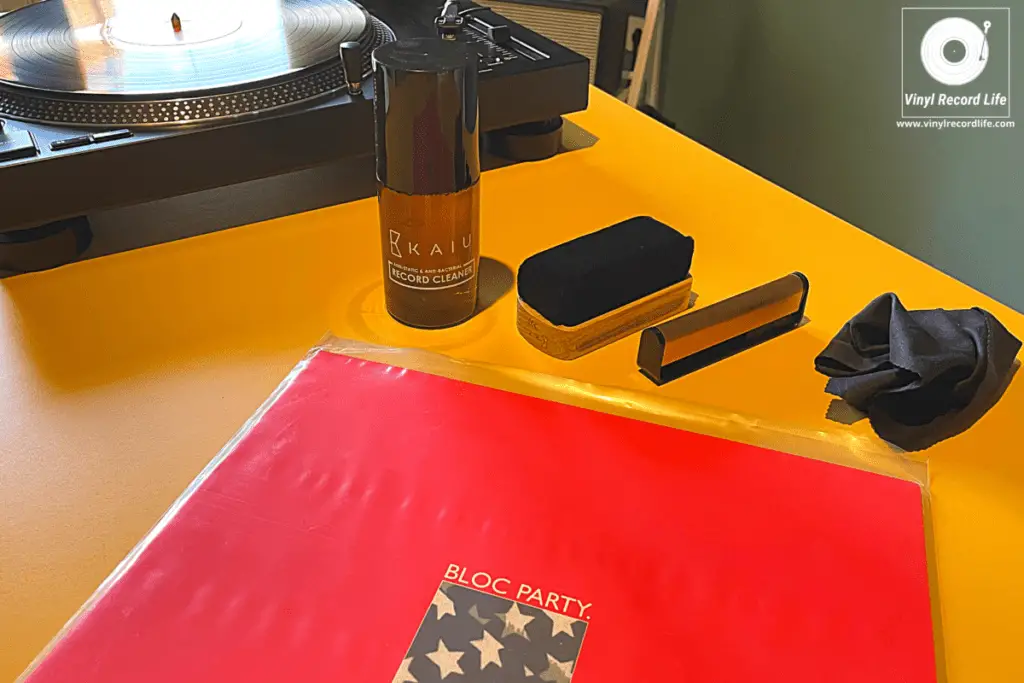
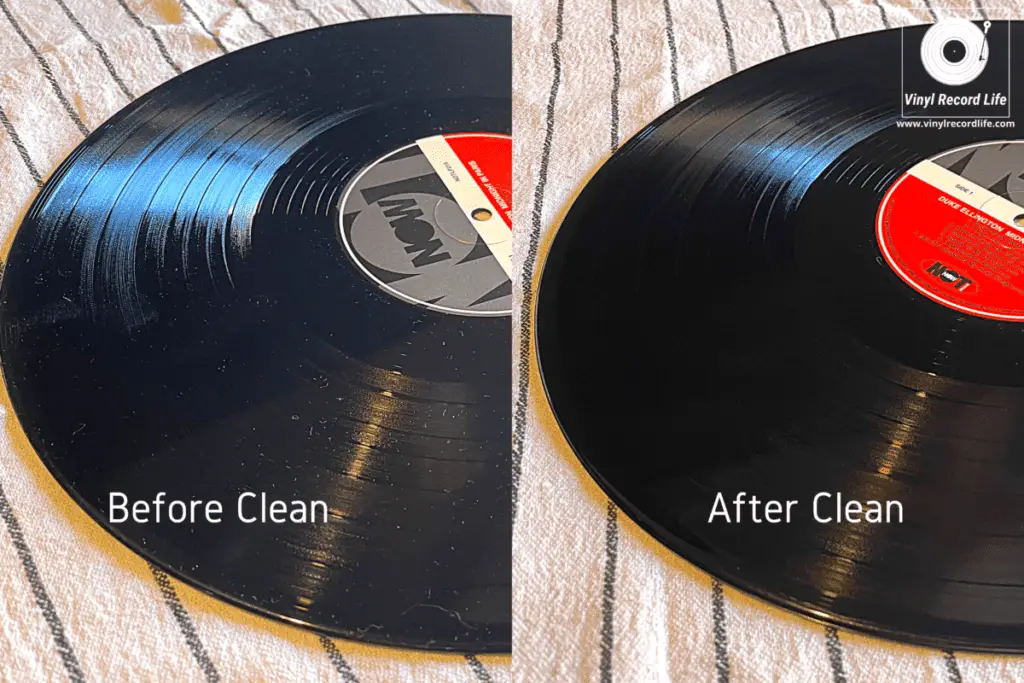
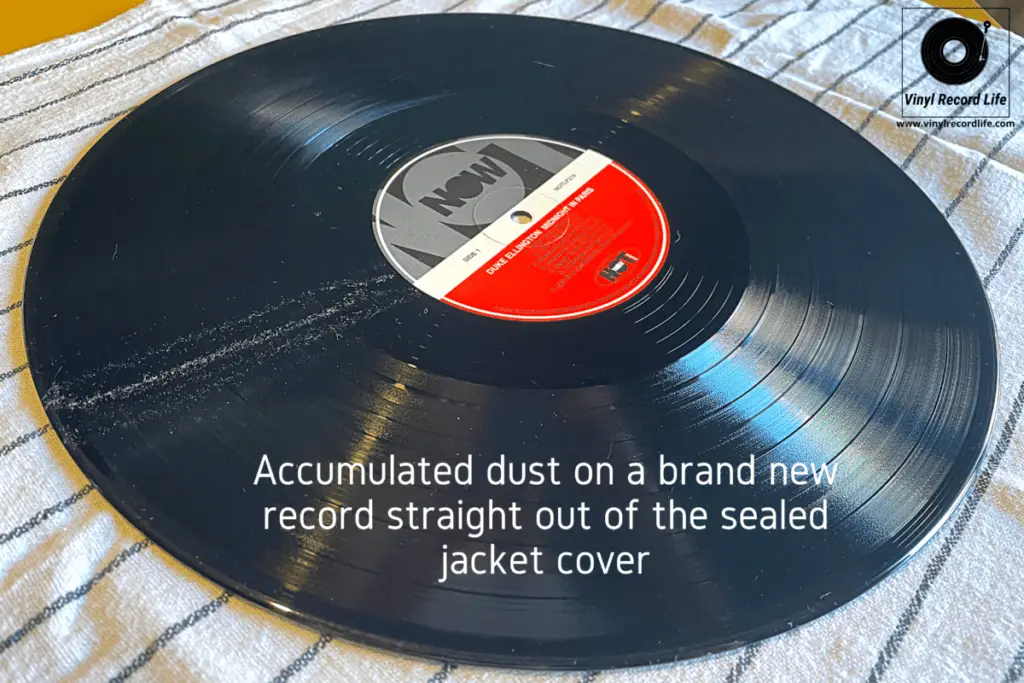
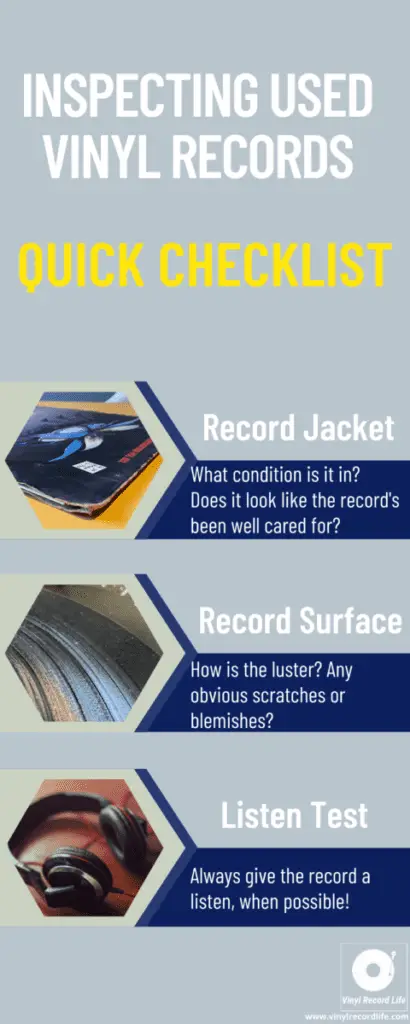
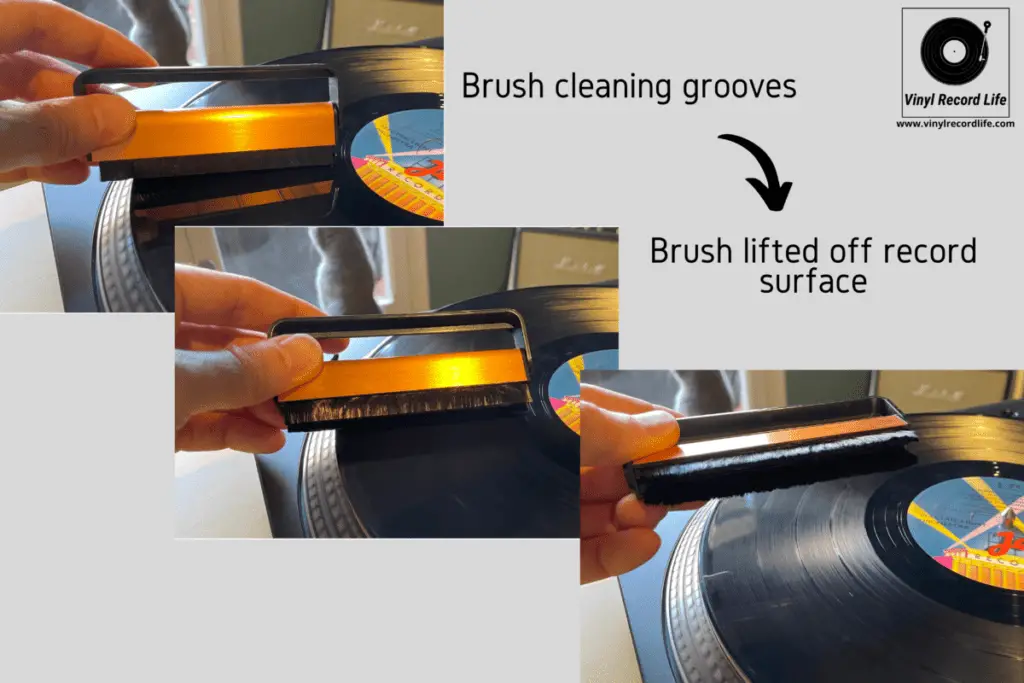
But before you ever attempt any kind of repair on a record, you should always first give it a good clean, to help minimize the risk of causing any further damage.

You may well find that what you thought you’d identified as damage on your record because of a sound defect was in fact embedded dirt, and that a good clean can solve the problem.

Repairing a Scratched Record: Step by Step Guide

Can you really fix a scratched record? Not always, and never completely, but it is possible to minimize the effects of scratches and the damage they can cause to your stylus.

Step #1: Prepare the Record

After you’ve cleaned your record, place it on top of a lint-free cloth that’s been laid down on a hard, flat surface such as a table top.

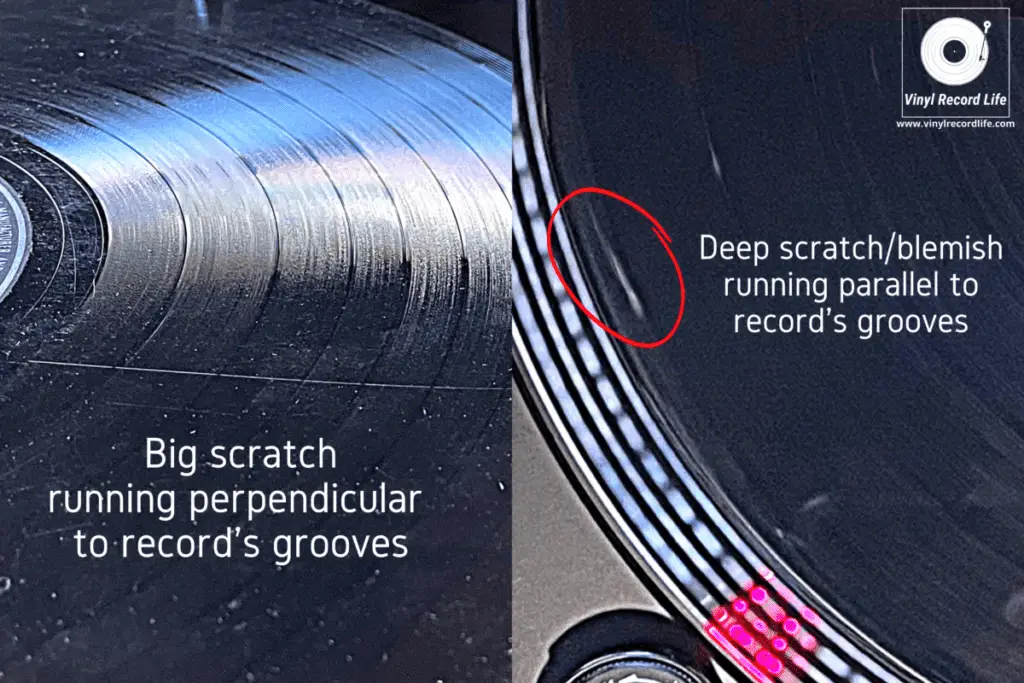
Step #2: Isolate the Scratch

Get some good light concentrated onto the record surface, and identify where the scratch is that you want to work on.

Sometimes, the scratch is staring right at you, but other times you may have heard a skip on your record while it’s playing but now that you’re looking at its surface you can’t see the offending damage.

This may be because it’s a micro scratch, and these are usually a lot harder to locate. However, if you’ve watched the spinning record while listening to it, you may have been able to work out where the scratch that’s causing the issue is.

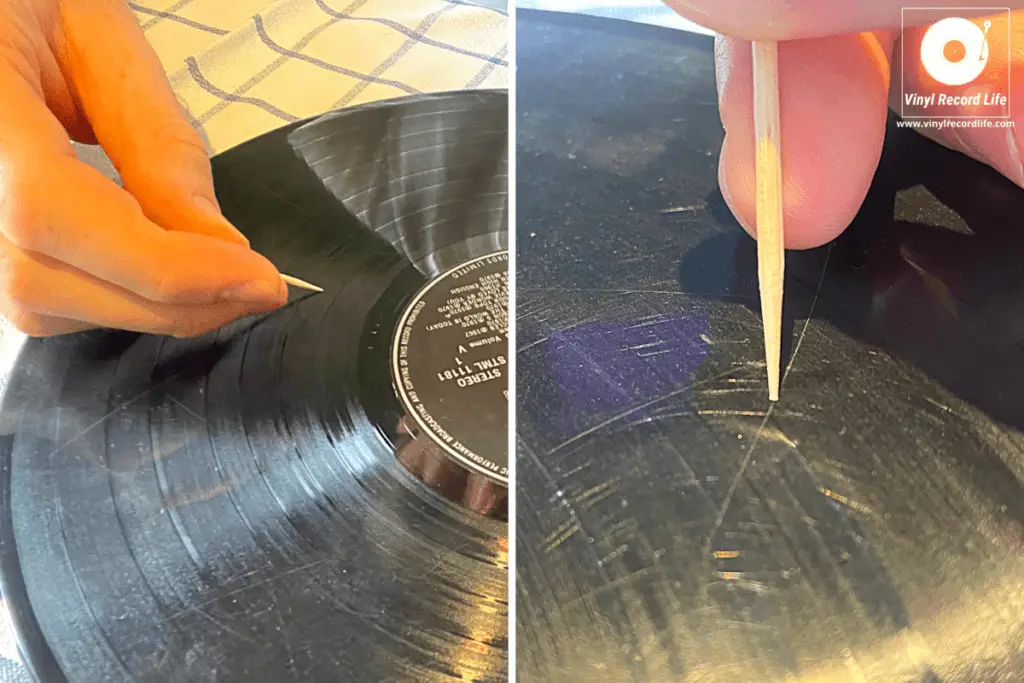
Step #3: Use a Wooden Toothpick to “Retrace” the Grooves

Once you’ve found the scratch, take a wooden toothpick, a magnifying glass or a USB microscope (or even a proper microscope, if you have one to hand!), and gently place the top of the toothpick into the grooves where the scratch is.

Very gently, rock the toothpick side-to-side, and edge it along the groove. This action is an attempt to delicately retrace the groove, and help clear the path for the stylus to be able to pass through without being forced to skip or jump out of the groove.

Once finished, give the record another good clean before playing it.

Attempting to retrace record grooves with a toothpick on a heavily scratched record

Repairing a Warped Record: How To Straighten Out Records That Have Become Misshapen

Fully recovering a warped record is much easier and far more likely than being able to fix a scratched record.

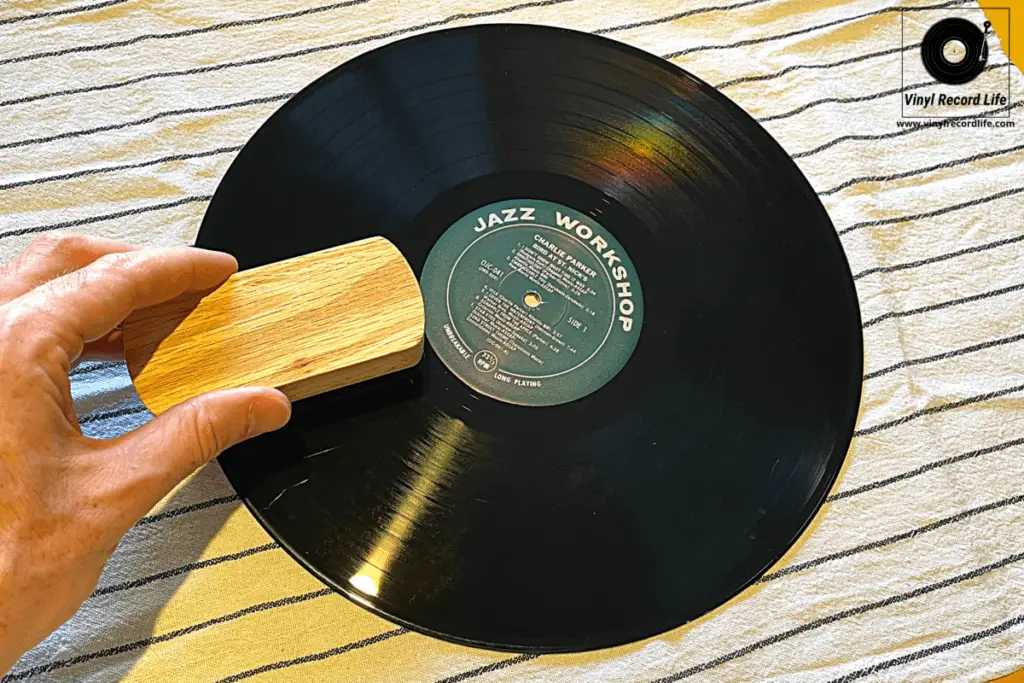
Step #1: Lay the Record Flat on a Clean, Lint-free Cloth

A microfiber cloth will work best here, so place your freshly cleaned record on top of one cloth, and then place another cloth on top of it.

The cloths should completely cover the record, protecting its entire playing surface on both sides.

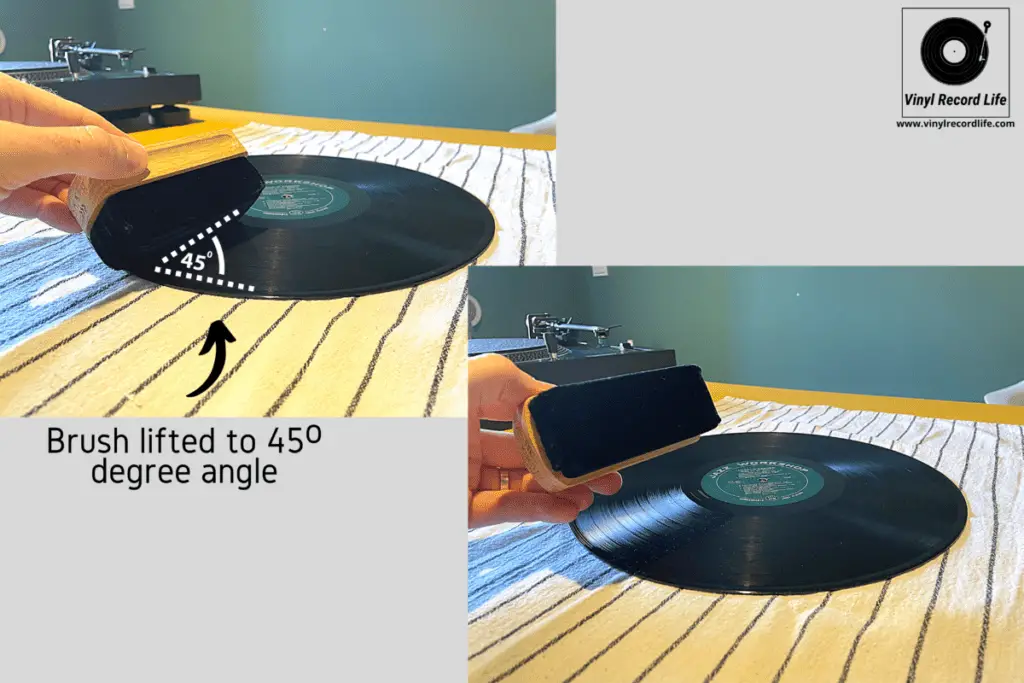
Step #2: Transfer the Record Onto a Heavy and Flat Object

Find something big, flat and heavy – but not too heavy – and which has a larger surface area than the record. A big book is my preferred object here.

The record should sit on top of the book (or whatever you’re using) and not overlap any of its edges.

Then place a second similarly large, flat and heavy object on top of the record, so that you have a multi-layered sandwich of heavy object-protective cloth-warped record-protective cloth-heavy object.

I can’t stress enough how important it is to not have something that’s too heavy. The weight should be such that it applies enough pressure to the record to gently and slowly flatten it, but not apply too much pressure.

Trying to Repair a Cracked Record

There are a lot of methods suggested online for fixing a crack in a record, but my honest opinion is that if a record’s cracked, you just have to accept it’s a goner.

Employing some of the many methods spouted online could cause real damage to your stylus.

On top of that, it’s not only extremely difficult but usually impossible to satisfactorily repair a crack in a record. Let it go!

How To Address Mold and Humidity Damage on a Record

If you’ve got a record that’s been affected by mold due to being stored in a humid or wet environment, then a deep clean is the best way to recover the record as much as possible.

A record that’s been affected by humidity and is showing some signs of mold

Check out our how to safely clean a record guide, in which we take you through the steps for giving your record a really good deep clean.

Once you’ve cleaned a record that’s been hit by mold, it’s important to give it a new inner sleeve, as the old inner sleeve has more than likely contributed to the condition of the record. Often, old paper inner sleeves on records have deteriorated to such an extent that they compound any moldy residue.

These anti-static inner sleeves (link opens in Amazon) are the ones I highly recommend – they work great and will help keep your freshly cleaned and now mold-free records just that.

If it’s the record’s jacket that’s gathered mold, you can try and clean it with some cleaning product and a cloth, but I’ve found that getting mold off the inside of jacket covers can be very difficult, especially if you’re trying to reach the corners inside the jacket.

For this reason, a new plain jacket cover may be a better option. You can still keep the old jacket and display it if you really like the artwork, but if it has mold it’s better not to keep a record stored inside it.

Mold can penetrate record grooves much deeper than the eye can see, so if you do have the option for a super deep clean with specialized machine, then this is always the best way to eliminate mold and all its traces, as a manual/hand clean will do a good job but might not hit every crevice of a groove where moldy residue may be lurking. 

Fixing Superficial Damage to Records Such as Jacket Covers

This is one of the easiest fixes as it’s not dealing directly with the record’s playing surface.

You can easily fix a record jacket cover with some neatly applied clear scotch tape to any tears, or frayed or split edges.

A split and frayed record jacket cover that’s been patched up with scotch tape

A record jacket is an important layer of protection for your record, so it’s important to make sure it’s always well sealed around the three edges that are supposed to be closed.

Another easy and quick step towards protecting record jackets is to buy a pack of new outer sleeves, like these ones, that will protect not only the record cover but which will also provide an extra layer of protection for the record inside.

Why Vinyl Records Warp, and How To Fix and Prevent It


A warped record is a fairly common thing to encounter when you’re building up a record collection, and despite your best efforts to avoid it happening, you’re more than likely to experience it at least a few times.

But what causes a vinyl record to warp, and how can you avoid it happening in the first place?

Vinyl records warp due to excessive heat, pressure, weight, and direct light, and are often affected by a combination of these influences. Careful storage, which takes into consideration these factors, will help minimize the risk of your record getting warped.

In this article I’ll take a more detailed look at all the things that can lead to a warped record, and also cover how you can prevent it happening, as well as some of the possible fixes that can be applied if you already have a warped vinyl.

A badly warped vinyl record…

How To Prevent a Record From Becoming Warped

Good record storage practice is the key to avoiding a warped record. For top tips on how to store a vinyl record collection, check out our guide.

Making sure your records are stored away from direct sunlight is a first step towards protecting them from warping.

That avoidance of heat and UV generated from sitting in sunlight will ensure your records don’t overheat, and if you’re able to keep them stored with an ambient temperature of around 65ºF to 70ºF (18-21ºC) then they’ll be kept in optimum conditions.

And of course keeping records stored vertically, without large batches of them leaning on one another, is crucial when it comes to avoiding the kind of slow build up of weight and pressure that can warp them over time.

How To Fix a Record That’s Already Been Warped

It’d be annoying to say prevention is the best fix, right? It is, but of course there’s always a risk that records can get warped, even when you take care with storing and handling them. Also, sometimes you do end up buying second-hand records that are slightly warped, and you won’t realize until later.

The simplest way to flatten a record, and my preferred method, is to simply place it between two heavy (but not super heavy) flat objects and leave it for a good while.

Clean the record well before you do this, to remove any potentially damaging dirt or debris, and protect it properly by placing it inside a fresh non-static inner sleeve. Then, place it flat on a lint-free cloth, with another on top – the aim here is to cushion the record so that its grooves don’t become flattened in the process.

Once you’ve got the record all set, carefully sandwich it between two weighty objects such as a pair of big books, before leaving it for a few days, and this should help flatten it again. You may need to go a second round, depending on how warped the record was.

I prefer this method as I believe it’s far less risky than some of the other ways people suggest. You’ll see some suggestions of placing your records between sheets of glass in an oven, which to be honest seems quite ridiculous to me as it’s not just impractical, but it’s tricky and potentially dangerous.

The only other way I’d recommend fixing a warped record would be looking up a professional service – there are studios that can flatten warped records for you – or, if you’ve got the money, inclination and also have a big second-hand haul of records to straighten out, to get a special record flattener.

Why Vinyl Records Warp: The Main Causes

Excessive Heat

Too much heat will make a vinyl record malleable, and therefore susceptible to bending and warping.

Polyvinyl Chloride, more commonly know as PVC, makes up 96% of the resin mix that is used to create a vinyl record, and PVC has low thermal stability.

This means that exposure to heat, UV rays and pollution leave the record vulnerable to damage. 

Generally, PVC has a maximum operating temperature of around 140ºF, or 60ºC, at which point distortion due to heat will occur. In fact, it will often happen even before it reaches that level. So a vinyl record will usually warp when its ambient temperature gets close to 140ºF.

Simply put, when vinyl records get too hot, the PVC component in the record reacts by becoming soft, and the disc can lose its shape. See here how heat affects vinyl records.

Direct Sunlight

As mentioned, UV has an impact on vinyl and can also lead to weakening the record, thus leaving it vulnerable to warping. 

Direct sunlight has a double impact of both UV and heat, so can be particularly damaging to records.

Too Much Pressure

Even without the two aforementioned factors, undue pressure and weight being applied to records can cause them to warp over time.

This usually manifests itself through poor storage of records, where they’re stacked incorrectly, left leaning against one another, or generally not treated with care.

All it takes is for a record to be left at a slight lean for a period of time for it to develop a slight warp, and if a little heat and/or sunlight are added to the mix then the conditions are perfect for a misshapen record.

How Can You Tell if a Record Is Warped?

Sometimes it’s glaringly obvious when a record has become warped, but often it isn’t quite so clear.

There are two ways you’ll be able to figure out if a record’s been warped; visually, or audibly.

By holding a record up, you’ll be able to see if its surface is true and flat, or if it’s warped. 

Hold it to your eye level, and look across the record’s surface from its outer edge towards the spindle hole in the center of the record. It should be fairly easy to gauge if the record is “true” and flat, or if it’s warped.

Alternatively, you can also place it on a flat surface, such as a tabletop, with a protective layer underneath it, and see how it lies on this flat surface.

When listening to a record, you’ll be able to detect warping through variations in the wow and flutter. 

Wow and flutter are pitch variations that you’ll hear with every revolution of the record – wow tends to be a slower change in pitch, and flutter a faster one.

Wow and flutter aren’t always detectable if they’re minimal, and they can also be caused by other mechanical factors of the actual equipment a record is played on, but by inspecting the record visually and paying close attention to the audio quality, you should be able to establish if the record’s warped.

Holding a record up to eye level to see if it’s showing any signs of being warped. This one looks good!

Is It Ok To Play a Warped Record?

If the warping of your record is minimal and doesn’t bother you, you may be wondering if it’s ok to play it regardless.

It’s always advisable to avoid playing a warped record, as it can impact a number of other things. 

Playing a warped record can place excessive pressure on the stylus and cantilever of your turntable, and by damaging these you’re not only affecting your audio equipment but also potentially damaging other records that will later be played on it.

Heavily warped records can cause the stylus to jump, and this can cause serious damage to both the stylus, cantilever and cartridge of the turntable, as well as the grooves of the already-warped record.

Are Vinyl Records Flammable? How Heat Affects Records


Excessive heat damages vinyl records, causing them to warp and deform, so it’s normal to wonder whether records are flammable. It can be a concern for those who’ve recently started collecting records.

Vinyl records are not considered flammable and will not ignite on their own. If exposed to extreme heat a record will wilt, and if placed into a burning fire it will burn, but a vinyl record is not considered to be a fire hazard on its own.

Often, it’s the packaging of a record, such as the cardboard jacket and inner sleeve, which are much more flammable and which pose more of a fire threat. The way in which records are stored will also play a role in whether they are susceptible to catching fire.

Despite not being flammable, records are vulnerable to heat, and in this article we’ll look at how and why heat affect vinyl records and how you can protect your records.

The Flammability of Vinyl Records

A vinyl record is made up of more than 95% Polyvinyl Chloride (PVC), which on its own is resistant to ignition, and has an auto-ignition temperature point of 850ºF (454ºC). Read more here about what vinyl records are made from.

Combining PVC with other materials will alter the flammability of whatever the final mix is, but in the resin mix that makes a vinyl record, the other materials – such as heat stabilizers – are there to help make the record more robust.

Of course, everything has its limit and as stated above a record will ignite at a critical temperature, but that is so high that it’s extremely unlikely to be reached in a normal atmosphere.

Vinyl Records and Exposure to Heat: The Effects

Far more likely to occur, and of therefore of greater concern, is damage to your records through exposure to moderate heat, the kind of which can occur frequently in normal living conditions.

Your records may not explode or go up in flames dramatically when exposed to a bit of excess temperature, but if your records are exposed to excessive heat it can be really detrimental to them, with the most notable outcome being warping.

Key Temperatures To Be Aware of for Vinyl Records

TemperatureResult
32ºF (0ºC)Record will become fragile and more susceptible to damage/breaking
65- 70ºF (18-21ºC)Ideal storage temperature for vinyl records
140ºF (60ºC)Record will start to deform and warp
212ºF (100ºC)Record becomes completely malleable

It’s widely accepted that an ambient temperature of between 65ºF (18ºC) and 70ºF (21ºC) is the temperature at which vinyl records can be stored safely, and won’t experience any undue stress.

We mentioned above that PVC’s auto-ignition temperature is around the 850ºF (454ºC) mark, but at a temperature of 140ºF, (60ºC) PVC will start to distort, so your record will deform and become warped.

If your record is exposed to temperatures exceeding 212°F (100°C), they’ll likely become so malleable that they can be rolled up like a tortilla.

To demonstrate what happens when a record’s exposed to these higher temperatures, we stuck an old, already-damaged and unplayable record in the oven at different temperatures. It’s advisable to not do this in a home oven, as vinyl records can melt and give off toxic fumes that are carcinogenic.

These were the results:

An experiment to demonstrate the effects of excess heat on vinyl records.

How To Protect Your Records From Heat Damage

The best way to stop your vinyl record collection from damage at the hands of excessive heat is to take care to store it correctly.

In our guide to storing vinyl records we outline the most important things to consider. Specifically for avoiding heat damage, the following points are essential:

  • Keep records out of direct sunlight. The heat from the sun can reach damaging levels, especially if intensified by other ambient environmental factors, and the UV from the sun will also be detrimental. Keep your records well sheltered from any direct sun.
  • Ensure a stable temperature for the room where you store your records. Heat fluctuations, especially towards the higher end of the thermometer, will not do your records any favors. Try to store them in a space where the ambient temperature will be as constant as possible, and avoid a room where you may need to switch the heating on and off at intervals.
  • Make sure it’s the right temperature. Also, storing the records  as close as possible to the optimum range stated earlier in the article is ideal.

Does Humidity Affect Vinyl Records?

Along with heat, humidity is a key factor in protecting vinyl records from damage.

Ideally, records should be stored at around 40-50% humidity to keep them in good shape.

Mold has ruined many records, and damp conditions or humidity that starts to creep above 50% can cause mold to grow and fester in record jackets.

Mold can even begin to manifest in the record’s grooves if the situation gets out of hand, so it’s really important to ensure the right humidity in your record storage area.

One way to help keep dampness and moisture that leads to humidity under control is to place a very small dessicant pouch in the corner of a record jacket. These 1g packs are the right size for this.

These pouches have desiccant properties and help to keep moisture well managed. It’s an extreme measure, but one which can help protect any prized records in your collection against mold.

Going in the Other Direction: Can Records Be Stored in the Cold?

Cold is far less compromising for a vinyl record than heat is, but it’s the change in extreme temperatures that does need to be avoided at all costs.

If your records are stored in conditions that are fairly cool, that’s fine, as records can be reasonably resistant to temperatures as low as 40ºF (5ºC). They’ll be okay just under that temperature too, but when they get to freezing point 32ºF (0ºC) they can become fragile.

What is to be avoided at all costs is storing records in any kind of environment that will see them experience the extremities of cold and warmth, as this will create plenty of problems as outline above, as well as conditions that can create humidity and moisture.

Why Cleaning Your New Vinyl Records Is Really Important


Does something brand new really need to be cleaned? If it’s a vinyl record, then the answer is a resounding yes!

In this article, we’ll cover why it’s such an important part of taking care of your records, and how you can make sure you’re doing it right.

New vinyl records should be cleaned before their first play to remove any dirt, dust or debris that may have been sealed inside the record sleeve during the production process. Cleaning a new record also helps to reduce the static build up it will have accumulated.

So what kind of dirt will a new record be carrying? What is static charge and how does it affect a record? Why is cleaning a new record beneficial and how best to do it? We’ll get into all of this below…

New Records, Despite Being Brand New and Sealed, Are Dirty

When a new record is manufactured and then pressed in the factory, it’s not just the music that can get embedded into the grooves.

During the whole pressing process, a number of different agents and solutions will be used. For example, a release agent is applied to the new record’s surface to ease the release of the pressing plate that “stamps” the music onto the disc.

Remnants of this release agent are often still present on the record when you unseal it from its fresh packaging.

Then there’s the fact that a record pressing plant can be quite a grubby environment, with plenty of dust and atmospheric debris floating about. These contaminants will always find their way to a newly pressed record’s surface (more on how and why further down!).

So, when you combine all these factors, it stands to reason that a new record’s playing surface can get pretty congested with undesirable material.

Also, tiny bits of the record’s packaging, such as very fine shreds of paper from an inner sleeve, will also add to the mix.

And that’s just a brand new record. Imagine what a used, second hand one could have collected, even a near mint condition used disc.

The same brand new record, straight out of a sealed jacket, before and after a clean

Records Are Statically Charged, Even When They Come In Brand New Sealed Packaging

All records get statically charged. This build up of static electricity on the record doesn’t just affect how it sounds – it results in crackle and pop – but it also compounds the accumulation of dirt, dust and other muck on your records.

Static is a fact of life for all vinyl enthusiasts. Even with a good cleaning routine, eliminating static charge on a record entirely isn’t possible, it’s just a case of minimizing it as much as you can.

But while you might expect static charge on a used record that’s seen a fair few plays, it’s also always present on a brand new record too. The record will usually carry some charge from its creation process at the pressing plant, and the packaging it came in will have added to that too. Taking the record out of the sleeve will also help to top up the static.

All this static attracts dirt, dust and other debris, and also makes it cling to the record once it’s landed there.

A brand new record, straight out of a sealed jacket, having had a carbon fiber record brush run over its surface a few times. Note the accumulation of dust that was sitting across the entire record.

Why Is It Beneficial To Clean a New Record?

Ridding the record of as much of this dirt as possible prior to its first play is important in getting the best possible sound, but also in preserving the record.

Dirt that isn’t removed from the surface of a record will quickly impact further and further into the grooves. This will cause a build up that, over time, can cause damage such as scratches to the record surface.

Removing as much dirt as possible from the very first play will also help to protect the stylus of your turntable. The stylus is delicate, and even a small amount of dirt can affect its performance and cause damage to it.

The sound quality of the record is the other major benefactor of a proper clean of a new record, and a continued good cleaning practice. A little crackle and pop can be very atmospheric when listening to a vinyl record, but it’s also a sign of static charge which in turn means the record is accumulating dust etc.

How To Clean a New Vinyl Record

There are some basic steps and practices you can establish to ensure that your records are in the best possible condition, starting with the very first clean right out of the packaging of a brand new record.

Our step-by-step guide to cleaning vinyl record safely covers the major points you need to be fully aware of, the different ways in which you can clean your records, and also how often you should clean your records.

And a top tip for when you buy a new record, is to replace the inner sleeve with a new anti-static one – I use and can highly recommend these ones – and to buy an outer sleeve to protect the jacket.

How To Inspect a Used Vinyl Record: Key Steps To Take


Used records offer so many great opportunities for expanding your music horizons, digging up old favorites, and uncovering gems. They’re a real part of the romance of collecting vinyl, but they can also come with plenty of pitfalls too.

Being able to inspect a used vinyl record properly is key to not getting caught out when buying one second hand, and will help you avoid wasting money on records that could also cause damage to your equipment.

The condition of used records can vary wildly, so the ability to spot any issues quickly will stand you in good stead.

To inspect a used vinyl record, remove it carefully from its sleeve and hold it up flat to eye level. Observe the sheen of the surface and whether it’s become overly dull, look for scratches or blemishes, and check for any warping or irregularity in shape. If possible, always give a record a play.

These are the quick, relatively superficial checks you can carry out to gauge the condition of a used record, but it always pays off if you have the time to spend even just a minute or two more going through a slightly more rigorous process.

In this article we’ll get into how you can do that, and the main factors to consider when inspecting records.

The Key Steps to Focus on When Inspecting a Vinyl Record

We’ve pulled together what we consider to be the most important steps you can take when inspecting a vinyl record, to ensure you’ve got a useful resource for knowing what to do.

Before getting started on inspecting a record, it’s important to quickly establish a couple of important things that will significantly aid what you’re about to do:

  • To inspect a record you need good light. Without being able to really show up the true appearance of the record’s surface, it’ll be much harder to do a comprehensive inspection.
  • You need to be ready to not feel self conscious about inspecting a record. This means be prepared to do what you’re about to do without any qualms about taking records out of their sleeves in a store or at a thrift sale. I’ve seen people feel inhibited about doing this, but it’s totally fair and part of the record-buying process to properly inspect a used record before buying it.

Step #1: Don’t Judge a Book by Its Cover, but You Can (Semi) Judge a Record by One

Don’t write a record off based on its jacket, but do take into consideration the condition it’s in.

A tatty, worn jacket cover often means the record’s not been stored well, or generally taken care of in the ideal manner.

Of even greater importance is the inner sleeve. If it’s really old, stained and/or torn or damaged in any way, then it’s most likely not been able to do its job of protecting the record inside.

If it’s an old paper inner sleeve then that means it hasn’t been changed for a very long time, and that the record may have been somewhat neglected.

If there’s no inner sleeve at all, then the record is likely to have a fair amount of dirt embedded in its grooves, and its surface most probably has a lot of finer debris sitting on it.

So, what is the general appearance of the record cover at first sight? And how does it make you feel about what kind of condition the record inside could be in?

Tip: When you do buy a used record, give it a new inner and outer sleeve, as the old ones will usually be extremely worn and carrying a lot of fine debris. My inner sleeves of choice are these ones (link opens in Amazon), and I use these outer sleeves.

Step #2: The Initial Visual Inspection

This is the first few glances you take as you see the record for the first time you get it out of the cover.

I tend to immediately look for the following:

  • Does anything jump out at me? Are there any obvious defects or damage that can be seen without even having to make the effort to look for them?
  • Is the record warped or out of shape? Sometimes this is so obvious that you don’t even need to look closely.
  • What does the center label look like? If this is clearly damaged or tatty/worn, then it’s usually a sign to me that other things will be problematic when I take a closer look at the record’s condition.

Always remember to handle records with care, whether they’re new or used. For top tips on how to handle a vinyl record properly check out our guide.

Step #3: Inspecting the Record’s Surface

Now that you’re ready to take a closer look at the record’s surface, this is where I take stock of the luster of the disc. How bright is it?

If the record still has a bit of a shine to it, then generally that’s a good sign. The duller the surface, the more worn it’ll be.

How smooth and unblemished is the record surface when held up to the light? If it reflects the light brilliantly then this is a good sign, and when you’re throwing some light on it for the first time you’ll see any dirt or dust that’s present. If there’s a little bit, it’s par for the course with a used record, but if there’s a satisfying sheen with little debris then you can be pleased!

Sometimes, a used record has had such little play that its inner sleeve still leaves very small slivers of paper on the surface. This is a great sign, and not to be confused with dirt. It can be taken as an indicator that the record’s had little use and should be in great shape. You’ll often only find this on brand new records however.

Step #4: Looking for Scratches and Blemishes

A crater of a scratch will jump out at you straight away, but often there are a lot of micro scratches on a record that can vary in severity from barely noticeable when listening to being completely unbearable.

You need to get the record under a bright light, and play with the angle of the light on the record’s surface to be able to survey and easily see the scratches. You can do it with ambient light too, but it may take longer.

Any kind of scratch can be potentially terrible, but the scratches that are almost in line with, or running parallel to, the record’s grooves can be the worst as these cause the record to skip. Scratches that run perpendicular to the grooves will cause pop when playing.

Don’t be afraid to run your fingers over the scratches too. Ordinarily, touching a record’s surface is a big no-no, but if you’re inspecting one and are planning on parting with cash for it, and you see scratches, trace your fingertips over the scratches.

If you can feel the scratch, then it’ll be heard a lot stronger than a delicate one that is either hard to feel or can’t be felt at all. Read more about scratches, how they occur and how to avoid them here.

Step #5: Another Telltale Sign To Be Attentive To

Always look at the edge of the record, as the start of each side is where the most significant damage can be done.

If the record’s previous owner wasn’t careful when placing the stylus on the record at the start of each play, then they may well have caused some damage there, and this will give you a heads up for the general condition of the disc.

Step #6: The Listen Test

This is something you really should do if you can. Most record stores will have a listening station where you can take second hand records for a quick spin. Take advantage of this.

Visual inspections using the steps outlined above will give you a good idea of what the record may sound like. But of course, your ears will be the real judge, so put them to work!

Inspecting Used Records: Quick Recap Checklist

As a final sign-off on the subject, here’s a brief summary overview of some of the most important points to look for when inspecting a used vinyl record.

And remember, it’s always a good idea to give a newly purchased record, whether it’s brand new or second hand, a good clean as soon as you get it home.

Enjoy your quest for some pre-owned gems!

How To Use a Vinyl Record Brush: Step by Step Guide and Tips


Record brushes are often used too infrequently, regularly overlooked or simply forgotten when it comes to taking care of a record collection, but they’re an essential and inexpensive piece of kit that can help keep your records in great shape for many years.

Using a record brush pre- and post-play should become a part of any record-playing routine, as it helps achieve the best possible listening experience.

To use a vinyl record brush, place the tips of the brush onto a spinning record surface. The brush should run perpendicular to the record grooves. Apply enough pressure for the tips to touch the record surface, but ensure the bristles do not bend. Hold in place for 3-4 revolutions of the record. 

Then, lift the brush off the record’s surface, and give it a clean by flicking the handle back and forth across the bristles. Never touch the bristles of the brush.

Read on four our full guide on how to use a record brush to its best effect. In this article we’ll cover why it’s important to use a brush on vinyl records, the different types of brush there are, as well as the steps to take when using each brush.

Everything you need to know about record brushes is here!

Why It’s Important To Use a Record Brush

A record brush has some major benefits for your record:

  • It removes dirt and dust that affect the sound quality and which can also cause lasting damage to both the record and the playing equipment.
  • It dissipates the static electricity charge which builds up on a record. This static also affects sound quality, and attracts dust and other debris to the record’s surface.
  • It reduces the need for more frequent deeper cleaning of the record, and while it doesn’t totally eliminate this requirement, it does have the effect that it helps to maintain the record in a much cleaner condition between more intense cleans.

Using a brush before and after playing a record should become part of a “best practice” routine.

For more on how to safely clean your records, including how to clean them with a cleaning solution, check out our detailed guide on cleaning vinyl records.

The Types of Record Brush Available and What They Do

There are a few different types of vinyl record brush available, and they offer slightly different benefits, so it’s helpful to understand them.

Carbon Fiber Record Brushes

A carbon fiber vinyl record brush is especially good for helping to remove the static electric charge that builds up on records.

The bristles of this type of brush are made from carbon fiber, a material which is widely applied in many other products such as flooring, and which acts as an anti-static agent.

The carbon fiber bristles “capture” the static charge from the record, and a conductive plastic body part of the brush helps to prevent any static charge from building up.

In addition, a carbon fiber record brush will also remove any loose dirt, dust or debris from the record surface. Intended for daily use, it does a good job of removing this superficial dirt and minimizing static charge, but it doesn’t get deep enough into the grooves to extract all the dirt that may be lying within.

Velvet Record Brushes

A velvet record brush doesn’t always have anti-static properties, and is generally better at getting into the grooves of the record and collecting whatever dirt matter may be lying in there.

Often, velvet brushes are used with a small amount of cleaning solution, to aid both the collection of the dirt and also to help reduce the static build up.

The method for using a velvet brush is also slightly different to that of a carbon fiber record brush, and we’ll outline this in the steps below.

Microfiber Record Brushes

A microfiber record brush is similar to a velvet brush in appearance, and is effectively the same thing but with a microfiber cloth stretched over where the velvet would sit.

Microfiber brushes can also be used with a small amount of cleaning solution for optimum results, and have similar results to velvet brushes.

Combination Record Brushes

A combination record brush is effectively a velvet brush with a thin row of microfiber bristles along each side.

It provides a neat solution as it offers the benefits of both a carbon fiber and a velvet brush, although personally I feel that the velvet element of these combination brushes isn’t able to be utilized properly.

For all brushes, you should never touch the bristles, velvet or microfiber fabric of them, as this will contaminate the brush with oils and dirt that are on your fingers. This will then be transferred onto the record, and over time will cause the degradation of the record’s surface.

If you’re looking for a record brush, I recommend getting this KAIU cleaning kit. It’s great value, includes record and stylus cleaning solution, and most importantly also contains two record brushes: one velvet, and one carbon fiber. I’ve been using these for a while now and can vouch for their quality – these are the brushes you’ll see used in the photos below.

A Step by Step Guide To Using a Carbon Fiber Brush for Vinyl Records

To get the most out of a carbon fiber record brush, follow these steps.

Step #1: Get Your Brush Ready and Spin the Record

Give the brush a quick clean to remove any dust that may have accumulated by flicking the movable handle back and forth over the bristles, making sure you don’t accidentally touch the bristles.

When that’s done, set the record spinning on the turntable.

Step #2: Placing the Brush on the Record

With the record rotating, place the tips of the bristles gently onto the surface of the record and hold the brush steady. The brush should be perpendicular to the direction of the record’s grooves.

The tips of the bristles should be touching the surface of the record with a light enough amount of pressure to maintain contact, but without bending the bristles. It’s the very tips of the bristles that need to get into the grooves and collect the dust and dirt.

Angle the brush slightly so that the bristles are able to easily flow in the same direction as the record is spinning. Hold the brush steady and in the same position for 3-4 revolutions.

Step #3: Removing the Brush From the Record

Once 3-4 revolutions of the record have passed, gently “scoop” the brush directly upwards and off the record’s surface.

Some record enthusiasts advocate for sliding the brush – with the bristles still in contact with the record – across the record’s surface either towards the center spindle in order to dissipate the static, or away from the center and towards the record’s edge.

Personally I like to avoid both of these methods and just lift directly off. Sometimes it does leave a bit of dust on the record’s surface, but I just repeat the process a few times.

I prefer doing it this way as sliding towards the center or edge of the record both drag whatever dirt has been collected by the brush across the record’s grooves.

Step #4: Cleaning the Brush and Repeating

Now that you’ve lifted the brush off the record’s surface, you can clean it by moving the body of the brush back and forth across the bristles. This helps flick off any dirt and dust, and also clears any remaining static.

You can repeat this whole process as many times as you feel is necessary, depending on the cleanliness and condition of the record. I like to do it twice, unless the record is particularly dirty, in which case I will keep repeating until I’m satisfied.

Carbon fiber brushes are good at collecting dust, but not necessarily at retaining it, so this repetition is necessary to ensure you’re clearing the record of as much dirt as possible.

A Step by Step Guide To Using a Velvet Brush for Vinyl Records

The process I use for a velvet record brush is slightly different to that of a carbon fiber one, and these are the steps I take.

Step #1: Place the Record on a Flat Surface

I place a clean cloth on a hard, flat surface to protect the record before I begin.

The reason for not cleaning a record with a velvet brush while on a spinning turntable is because you need to apply a little more pressure to the velvet brush, and doing this while the record is on the turntable could cause damage to the equipment.

As the velvet brush has the potential to clean deeper into the record’s grooves than a carbon fiber brush, thanks to the better contact it obtains, it’s necessary to press slightly harder with the brush when cleaning.

Step #2: Gently Drag the Brush Around the Record, Following the Grooves

Place the velvet brush on the record’s surface, and move it around the record, following the grooves and applying a little bit of light pressure, for a full revolution of the record.

Step #3: Lift the Brush off the Record’s Surface

Once you’ve completed one full revolution of the record, carefully tilt the brush to a 45º degree angle and lift it off the record.

Now clean the velvet brush with either an anti-static cloth or a special smaller brush, which often comes with the velvet brush.

Now repeat steps 1-3 as many times as is necessary to get the record to a level of cleanliness that you’re satisfied with.

A velvet brush can be used for a light wet clean too. All you need to do is spray a little bit of cleaning solution onto the record’s surface as part of the first step.

Using a Brush To Clean Vinyl Records: A Final Word

As outlined above, using a record brush before and after playing your records will benefit them not only for the play you’re listening to, but also in the long run too.

I use a carbon fiber brush before and after every use of a record, and I’ll use a velvet brush with a little cleaning solution on a record I may have used a few times in a short space of time.

It’s also good to think of using a record brush as a light bit of maintenance work, but not as a full-on cleaning solution.

Use your record brush to keep your records clean on a daily basis, but for a deeper clean every so often you’ll need to use a cleaning solution.