Recent Posts

The Full Cost Breakdown of Pressing a Vinyl Record


Ever been listening to one of your favorite records and wondered: How much does a vinyl record cost to produce?

It’s something that’s crossed my mind more than once, and while I always had a rough idea of the general cost involved, my intrigue was renewed when speaking to a friend who plays in a group.

They told me they were planning to do a run of 100 vinyls of their band’s next EP, and we discussed the costs involved and how many records they’d need to sell and at what price to break even.

The average cost to make 100 vinyl records is $1225. Most record pressing plants will not produce a run of less than 100 records, to ensure a return on investment of initial set-up costs. The cost of pressing a record can rise when colored labelling, artwork and various other factors are modified.

These various other factors can make the overall cost either lower or higher, but the average of $1225 for a run of 100 records is based on the most economical options.

To help understand how and why the overall cost can vary, I’ve broken down the various stages of the record pressing process in this post and how they can influence the overall cost of pressing a record.

We’ll also get into the factors that can have a real influence on the cost of pressing a vinyl record in this article, but first up let’s look at breaking down the actual cost itself.

How Much Does the Record Pressing Process Cost?

To give a clear idea of the cost of pressing a vinyl record, we got detailed quotes with a breakdown of overall cost from four different plants.

In the following table, we’ve put the average cost across the four quotes we received for each element, for a stock/standard pressing of a two-sided 12” record with plain labeling, sleeves and jackets.  

Cost elementAverage costExample cost for a pressing of 100 records
Lacquer cutting (per side)$190$380
Plating (per side, 2-step)$170$340
Center labels (per label)$0.05$5
Inner sleeves (plain white)$0.15$15
Jackets (stock black or white)$0.75$75
Pressing set-up fee$190$190
Test pressing (5)$65$65
140g black vinyl record (per unit)$1.55$155
Total demonstrative cost for pressing run of 100 records:$1225

So, the average cost to press 100 12” vinyl records is $1225.

This cost can rise considerably when any of the cost elements listed in the above table are adjusted. More information on how these costs can fluctuate is in the final section of this article.  

The Steps Involved in Pressing a Vinyl Record

To help understand what’s really involved in pressing a vinyl record, and how the various stages affect the overall cost, let’s take an overview of the process.

Step 1: Pre-Master the Audio

Before the record is even pressed, the audio needs to be mastered properly so that it’s ready to be committed to vinyl.

Mastering gets the audio ready for the next step of the process – the vinyl lacquer cutting stage – and there are various requirements of the mastered audio source file to ensure the best possible vinyl pressing is achieved.

The standard format for a vinyl master file is 24-bit 96kHz, as either a WAV or AIFF. This is the ideal format – others can work, right “down” to CD quality audio at 16-bit 44.1kHz, but MP3 files just don’t cut it as a master file for cutting vinyl.

For more on the debate around whether digital or vinyl is better, check out our post here.

Step 2: Cutting the Music onto a Lacquer

Once the audio’s been mastered and is ready, an engineer will then use a lathe to cut the lacquer disc of the audio recording. This lacquer serves as the mold for the next step.

Step 3: A Metal Stamper is Created

The lacquer is then treated with various metals and chemicals, which fuse to solidify and create a metal stamper in the mold of the lacquer.

Step 4: Test Pressings as a Quality Check

With this metal stamper a test pressing of the record is usually run, and the recording is reviewed by the engineer, artist etc to ensure the recording is faithful to the original before a full run is pressed, as well as catch any sound anomalies or flaws.

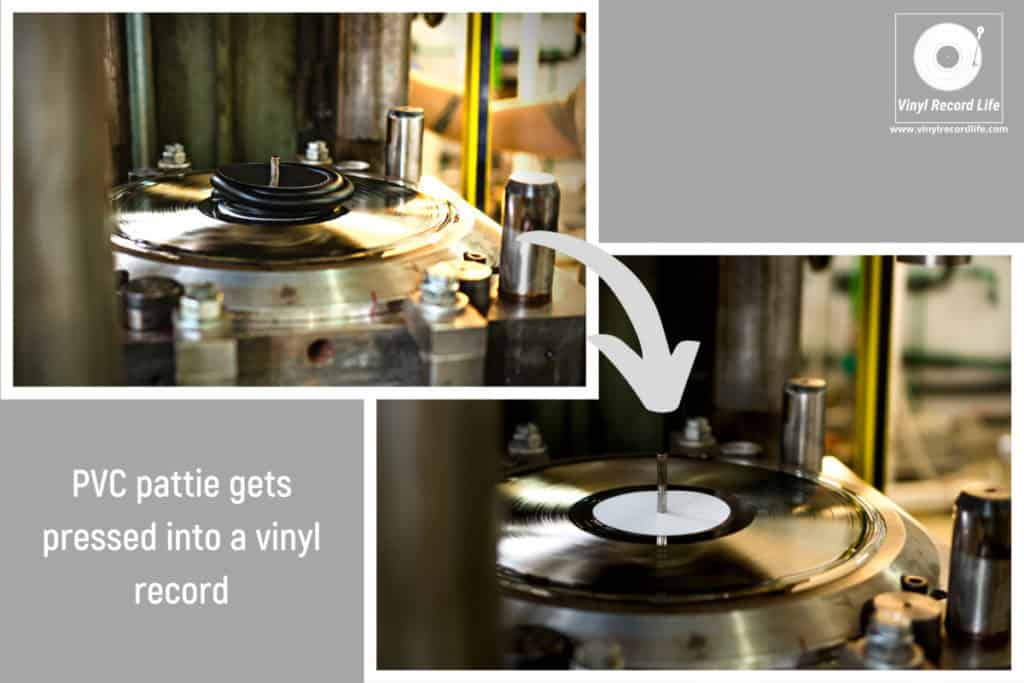
Step 5: The Vinyl is Produced

This is the step where the actual vinyl record is produced, and the music pressed onto it.

PVC pellets are molded into small “patties”, and the metal stamper is then pressed down, flattening these patties and imprinting the music onto them to create the record.

For more on what a record is actually made from, check out our This Is What Vinyl Records Are Made Of post!

What Factors Influence the Cost of Pressing a Record?

There are a few factors that can impact the final overall cost of pressing a vinyl record.

The Quantity of Records in the Pressing Run

Pretty much any record pressing plant will have a minimum run requirement, and this is usually 100 records.

It all comes down to set-up costs – producing fewer than 100 records after investing in cutting the lacquer, creating the metal stamper, running test pressings etc just doesn’t make much sense for the plant or the customer.

Logically, the larger the quantity of record in the pressing run, the more expensive the final cost becomes, although there is an economy of scale insofar that the per-unit cost of each record will actually become considerably cheaper the larger the run.

For example, pressing a run of 1000 records using the cost outline in our table above would cost $3475, compared to the $1225 for 100 records.

So it’s easy to see that while you’d be pressing 10x as many records, the cost is just under 3x as expensive, thus making larger runs more economical.

The Weight of Vinyl Impacts Cost

Going for the weightier 180g vinyl pressing over the regular 135g will bring the cost up.

180g records are considered by some to be more durable and their sound quality has been touted as being better, although this is also a claim that’s caused a lot of debate as to its veracity.

In general, we found that using 180g vinyl over 135g doubled the per unit cost for each record from an average of $1.55 to an average of around $3.

The Number of Sides of the Record Being Pressed

Some will opt to only have music on one side of the record, but the norm will be to have music on both sides.

Having music on both sides of the record will mean the cost will rise as the lacquers and metal plates produced will be doubled, but as it’s much more common to press music on both sides of the record this cost is par for the course.

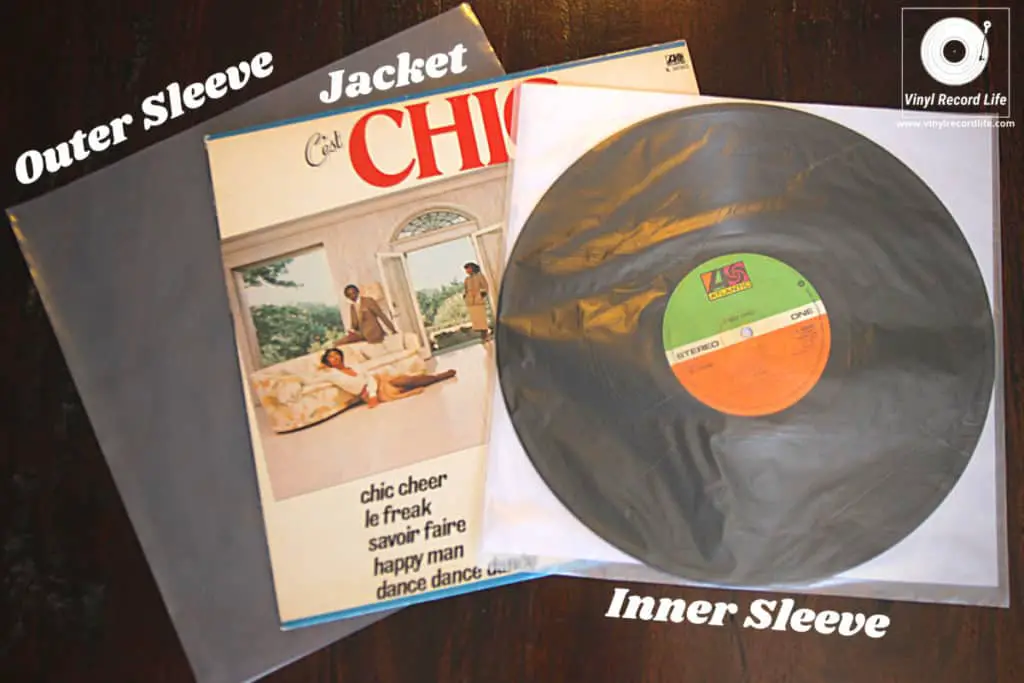
Labels, Jackets and Sleeves Affect Cost

A plain white center label will be cheaper than a printed color label, likewise a plain white inner sleeve will bring the overall production cost down as opposed to having a printed sleeve with color.

In our cost quotes, a full color center label averaged $0.50 vs $0.05 for a plain white one. Full color printed inner sleeves averaged a cost of $0.70 vs $0.15 for plain white ones that we opted for in our example cost table.

It’s the same for jackets. If the run includes a basic white or black jacket then this will keep the overall cost down (as per the $0.75 per unit example in our table).

Opting for a printed jacket with just one color can raise the cost considerably, and having multiple colors will only see that rise. We saw an average quote of $1.75 for a full color printed jacket.

Going all out and having a color gatefold jacket can easily double – or even triple – the final overall cost of this line in the breakdown. We saw an average cost of $4 per jacket across our quotes.

Colored Vinyl Will Up the Cost

Novelty factors such as colored, glow in the dark or picture vinyl will also be more expensive and drive the overall run cost up considerably.

How To Play a Vinyl Record: A Detailed Guide With Photos


Playing a vinyl record is one of those things that’s easy and straightforward when you know how to do it correctly. It’s also just as easy to get wrong and cause damage to your records, if you’re unsure of how it works.

It’s a question that a lot of people have when they’re getting into vinyl for the first time. I remember the first time I (tried to) play a record – I got it wrong and damaged one of my uncle’s!

So, it’s important to get it right! Not just to protect the record being played, but also to get the best possible sound. There’s a bit of a process to it, which is fast and easy to master, but is worth getting right first time around so that it becomes second nature.

To play a vinyl record, place it on the turntable platter. Start the turntable and clean the record with an anti-static brush. Use the cueing lever to raise the tonearm, and move it across to the record. Line the stylus up with where you want to start playing the record and then lower the tonearm.

It’s that simple, but as mentioned above there are a few extra things to be aware of when you use a turntable to play a record, and they’re covered in this article.

I’ve put together a clear step-by-step guide, with accompanying images, that shows you how you can safely play your vinyl records and be confident that you’re doing it in such a way that protects your records, takes care of your equipment and also gets the best sound!

Getting Set Up to Play a Vinyl Record

Before you start spinning your records, there are a few things you can check over quickly to make sure you’re all set for the best listening experience.

Check Your Turntable is Level

Always make sure your turntable or record player is level before playing records. Sometimes they can get a little off kilter, and a quick adjustment of the unit’s feet will ensure its steady and level. A record player that isn’t level can cause damage to records over time.

Using a high-precision turntable bubble level like this Audio-Technica one will help get your platter perfectly level (link opens in Amazon).

Remove the Dust Cover and Check the Record Player is Clean

It might seem like an obvious one, but removing the dust cover from your turntable (if it has one) prior to playing a record is necessary. It’s also worth checking that your turntable/record player is clean in general and free from dust before putting any records on it.

Check Your Record for Damage

A visual inspection of records before playing them usually helps to avoid any unnecessary damage to your stylus, as this delicate component is super sensitive to anything on the surface of a record. Also, ensuring your record isn’t dirty before playing it is important, as it may need a deep clean before you spin it – more on the cleaning of a record in the steps below.

Is the Tonearm Properly Calibrated?

If it’s been a while since you checked the calibration of your turntable’s tonearm, it’s always smart to do a periodic check on the tracking force, anti-skate setting, etc, to make sure things are all set right. This is important both for sound and stylus/record preservation.

A Quick Inspection of Your Stylus

These things are sensitive and will attract any dirt and dust that may be lurking in the atmosphere. The stylus will also scrape up any debris that remains in the grooves of the record, so giving the stylus a fairly regular check and a weekly clean with a stylus brush will avoid most issues.

Make Sure Your Speakers are in a Sweet Spot

If you’ve got a set-up that incorporates separate/standalone speakers, then positioning these correctly will massively affect the sound and your listening experience. You don’t want them to be too close to a wall, neither too close together – the ideal speaker set-up creates an equidistant triangle between yourself and the speaker.

A Step-by-Step Guide to Playing a Vinyl Record

You’ve picked out the record you want to play, your turntable or record player is all set, ready and waiting, let’s dive right into it…

Step 1: Remove the Record from Its Sleeve and Place It on The Turntable

Carefully take the record out of its jacket and inner sleeve and place it on the platter of the turntable. Check out our guide on how to handle your records here if you’re not entirely sure of the best way to hold them.

Tip: always make sure you’re storing your records in decent anti-static inner sleeves. This is my recommendation – they’re the ones I use, they don’t cost very much and they do a fantastic job.

Step 2: Start the Turntable and Give the Record a Clean

With the record sat on the platter, hit the start button to initiate the turntable and set the record spinning. Make sure you’ve switched to the correct speed selector, so that the turntable’s running at the speed which corresponds to the record.

With the record spinning, take an anti-static brush and gently clean the record to remove any dust or dirt that may be on the playing surface. If the record is brand new, it’s worth giving it a deeper clean.

For a detailed guide on how to clean your records we’ve got you covered with our Safest Ways to Clean Vinyl Records: A Guide (With Pictures) feature.

It’s important to give a record a quick dry clean with an anti-static brush both before and after playing, as it helps keep the record in great shape and also ensures you get the best possible sound when listening to it.

Step 3: Engaging the Tonearm

Now that the record’s spinning and has been cleaned, it’s good to go!

To engage the tonearm, use the cueing lever to raise the tonearm from its cradle. Once elevated, gently move the tonearm across to the edge of the platter, so that it is hovering above the outer edge of the record as shown in the picture.

A record always starts from the outside edge, and the needle works its way towards the center of the record as the music plays.

To play a vinyl record from the beginning, you’ll need to line the stylus up with the outer grooves on the outside edge of the record. Then, lower the tonearm gently using the cueing lever, and the stylus will come into contact with the record’s playing surface.

If you own a record player that doesn’t have a cueing lever, you’ll need to lift and lower the tonearm by hand. Do this with great care, as the stylus can damage the record if it comes into contact too aggressively (you can also damage the stylus). Resting your pinkie finger on something steady next to the platter will enable you to raise and lower the tonearm steadily.

Now that the record’s playing, you can sit back and enjoy the music!

Step 4: How to Change Songs on Your Record Player

If you want to skip a song on your vinyl record or go direct to a particular track, you can move the tonearm to the start of the relevant track.

Identifying the start of each track on a record is easily done by counting the noticeable lines which mark the beginning of each track. Taking the same care to raise the tonearm with the cueing lever, and then lower it at the right place, you can simply go direct to the song you want to listen to.

For a full walkthrough on how to work out where each song starts on a vinyl record, and how to start playing from that track, check out our Guide to Changing Songs on a Record Player.

Step 5: How to Stop the Record

To stop the record, raise the tonearm using the correct method while the record is still spinning. Never stop the platter from spinning before you’ve raised the tonearm.

Return the tonearm to its cradle, and while the record is still spinning on the platter give it a dry clean with an anti-static brush, using the same process as in Step 2.

Once you’ve cleaned the record, hit the start/stop button to bring the platter to a stop, and return the record to its sleeve immediately, or turn it over and play the other side.

Useful Things to Know When Playing a Vinyl Record

Sometimes things go a bit wrong when you’re playing records, despite you taking great care to ensure the record and your equipment are all set up properly.

If you encounter any problems with the quality of sound when the record is playing, check out our troubleshooting guide which identifies various causes of bad-sounding record players.

Another possible problem can be the tonearm playing up. If you’re experiencing issues with the arm, see if they fall under any of the 10 most common ones we’ve identified here.

Something else that can affect your enjoyment of listening to a record is excess crackle. A certain amount of crackle is inevitable, and often adds to the richness of the listening experience (well, it does for me!), but too much is usually an indication that the record has a build-up of static, has embedded dirt, is damaged, or a combination of these factors.

To find out more about crackle, its causes and how you can minimize it, head over here.

Finally – but by no means definitively! – if your record sounds like its playing too fast, too slow, or has warps, lags or unusual drags or speed-ups in sound, it could be down to several reasons.

We’ve covered the causes of records playing too fast or slow here, so if you experience any issues in this area when playing your vinyl records be sure to give it a read.

Storing Your Vinyl Records: Everything You Need To Know


If you’ve started building up a record collection, however fledgling it may be, you may be wondering about the best way to store it.

Vinyl record storage is an important subject. Records are easily damaged, and a lot of the ways in which they can get damaged are easily avoidable.

Vinyl records must be stored vertically to ensure they are preserved in the best possible condition. Storing records upright helps avoid them becoming warped, scratched and even broken. Records also need to be stored away from direct sunlight, kept dry and not experience fluctuations in temperature.

The covers you place your records inside are just as important as where they’re stored, as is the way they’re handled when they’re being put away.

In short, storing vinyl records is a process that has a few steps, all of which require a level of attention and care to ensure that the records not only remain undamaged, but are kept in ideal condition to preserve their sound quality.

This article covers the most important things you need to know about storing vinyl records…

Always Clean Your Records Before You Store Them Away

The protection of your records starts before you even store them. Giving a record a quick but careful clean before placing it in its cover helps to remove any dirt, dust or debris that it may have picked up.

Because records create static, they can easily attract a lot of dirt particles that float about in the air. If this dirt is not removed from the record before it’s stored away, it can become embedded in the record’s grooves.

Not only will this negatively impact on the sound quality of the record over time, but this debris can also cause damage as it gets more and more impacted into the vinyl over the course of time.

A swift clean with an anti-static brush before returning a record to its sleeve will help remove the bulk of anything that’s made its way onto the record’s surface.

If you’re planning on storing your records for a long period of time, a deep clean is recommendable. Check out our guide to cleaning records for more info on the best way to go about this.

Make Sure You’re Handling Your Records Like a Pro

The way you handle your records plays an important role in storing them correctly.

As outlined above, cleaning them is essential to keeping them in great condition, and the way you hold them is just as significant. Handling records in the wrong way gets them dirty, which in turn can lead to their deterioration.

There are a couple of simple things to remember: never touch the record’s playing surface, and always hold the record by its outside edges.

We go into detail on the best practices for handling vinyl records in our specific guide, which is accompanied by step-by-step images to help show you the best way to go about this.

Make The Small Investment in Inner Sleeves – It’s Worth It

Few things are more important than what your record will be in direct contact with while it sits around for days, weeks or even months waiting to be played. This is where quality inner sleeves come into play.

The first thing I do whenever I buy a record, be it brand new or second hand, is clean it and then place it in a fresh, brand new anti-static inner sleeve made from anti-scratch plastic.

These inner sleeves are my choice (link opens in Amazon) – there are plenty of others available but I can highly recommend these from a lot of personal use.

The paper inner sleeves that most records come in will degrade over time, leaving deposits on the record that get lodged in the grooves and contributing to its decline. Paper is also really abrasive and will wear away at the record, so those paper inners are to be steered clear of.

Inner sleeves are the first line of protection for your records when they’re stored away, so the importance of getting good quality ones can’t be understated.

Outer Sleeves Are Just As Important For Preserving Your Vinyl Records

Not only do plastic outer sleeves help to keep the jacket cover of records in good shape for much longer, they also provide another layer of defense against dust and light.

How many cardboard record jackets have you seen frayed, split and falling apart at the seams when sifting through second-hand records at a store, or even in your own collection?

An unprotected jacket will feel the strain after a certain amount of time, and an outer sleeve will help keep it fresher for longer. They also help make it much easier to slide records out from a shelf, reducing friction between record covers.

The material they’re made from is just as important as having an outer sleeve in the first place. Many older outer sleeves, and a lot of ones still produced today, contain PVC, and this can contribute to the deterioration of records over time.

Polyethylene plastic is a much more record-friendly material and I use these outer sleeves (link opens in Amazon), again because they’re great value and decent quality.

Vinyl Records Need to be Stored Vertically

When it comes to placing your records wherever they’re going to live, there is one major rule that needs to be adhered to: vinyl records must always be stored upright. It’s never OK to store records flat.

There are a few main reasons why storing vinyl records vertically is so important, principal among them being to avoid warping. Records that are stored at a slant, however slight, will deform over time, while records piled one on top of another face more than just this threat.

Stacking records causes myriad issues. Any dirt, dust, grime or other debris that’s managed to cling to the record’s surface will grind into the record, causing scratches, blemishes and general damage.

It’ll also get pressed further into the record’s grooves, so as well as potentially damaging the disc the sound will also get affected. And that’s before the damage this embedded groove dirt can do to your turntable stylus.

Another tip to keep in mind when storing your records is to store records of similar sizes together, so 12 inch records shouldn’t be mixed with 7 inch records. This will help to avoid warping and other damage if the records do lean ever so slightly at any point. Avoiding packing too many records into one space together is also a key point for consideration.

Minimizing, or even better, eliminating any pressure applied to records when they’re being stored will help keep them safe, in the correct shape and out of harm’s way.

Suitable Storage Methods and Solutions for Your Vinyl Record Collection

Vinyl records need to be well supported, kept upright and given a rigid, snug place to sit when they are being stored.

For this reason, the best solution for storing records is a secure shelving solution which ideally has compartments.

The Ikea Kallax shelving unit has become synonymous with vinyl record storage as a cheap, sturdy and effective solution, and its blueprint provides the ideal outline for how records should be stored. I’ve got a pair of 8-cube Kallax and they’re perfect for the job at hand.

There are plenty of cube-style shelving units similar to the Kallax, as well as customizable options, available to buy for your records.

Record dividers can also be used on shelving units, which enable you to provide extra support and protection for records, as long as the dividers are rigid, strong and provide support coverage for the entire dimensions of the record. They’re also a great way or organizing your records, of course.

The other storage solution which I personally vouch for is a flight case, although this perhaps isn’t as practical as a shelving unit when it comes to space in the home. They look great though, and they fulfil the main criteria for protecting records. I’ve got a pair of Citronic CV50 cases, but these appear to have been discontinued as they’re really hard to find now, but this model is very similar (link opens in Amazon).

Decorative storage solutions can be just fine too, and for those who don’t have a large record collection these can be the way forward as a full shelving unit may not be necessary. We’ve looked at 11 great display options for records in this post.

Ensuring the Ambient Atmosphere is Not Detrimental to Your Records

There are plenty of environmental aspects that can pose a risk to your records, so these all need to be addressed when you’re deciding where and how to store your records.

Direct Sunlight and UV damage

Keeping records out of direct sunlight is essential. UV from direct sunlight will damage records, and if they’re in direct sunlight for any sustained period of time they’ll be subject to heat too. This can lead to warping, among other problems.

Extreme Heat/Cold and Temperature Fluctuations

Information on the right temperature at which to store vinyl records varies depending on where you source it, but in general there is a consensus that an ambient temperature of between 65ºF (18ºC) and 70ºF (21ºC) is best. A stable room temperature will usually be more than safe enough.

It’s easy to get hung up on things like temperature for storing records, so common sense is often your best friend here. Avoid storing records next to heaters or radiators, and keep them away from windows where they may be susceptible to direct sunlight.

Avoid Humidity and Dampness When Storing Records

Similar to temperature, humidity levels should be kept as stable as possible, with a level of between 40% to 50% relative humidity being about right for storing vinyl records.

As long as your records are kept in a dry place, where damp can’t creep in, they’ll be fine. Mold is one of the enemies of vinyl records, and I’ve seen more than a few fall victim to it when sifting through second-hand records at flea markets!

The Safest Ways to Clean Vinyl Records: A Guide (With Pictures)


Taking great care of your records is one of the most important factors in ensuring you’re always getting the best possible sound out of your collection, and keeping your records clean and in the best possible condition is one way to achieve this.

We all know records are delicate and need to be handled with care, so how do you clean vinyl records at home effectively, while also making sure you’re not damaging them?

To clean a vinyl record, remove dust and debris with an anti-static record brush. Apply a specialized cleaning solution and wipe the record surface in a circular motion – following the record grooves – with a clean, lint-free microfiber cloth. Then use a dry microfiber cloth to remove any residue.

Once you’ve removed any excess cleaning solution, it’s important to then allow the record surface to dry completely before you play or store the record.

This is the simplest, fastest way to clean a vinyl record, but there are a few different ways to go about it and I’ll discuss them below, from the basic and cheap through to the affordable but more rigorous, right up to the “luxury” option, which is far costlier.

Most people will be looking for something simple, cost-effective and safe, and this is what the below step-by-step guide I’ve laid out with accompanying photos further down this article focuses on.

Why It’s Important to Clean Your Records

Keeping your records clean has numerous benefits, key amongst them ensuring the longevity of your records, protecting your equipment and getting the best sound and listening experience.

Records collect dirt, dust and all manner of other debris even when they are well cared for, so removing as much of this as possible on a regular basis is essential. A dirty record is one of the main reasons why you may be experiencing a sub-optimal listening experience – read more on the main causes of bad-sounding records, and how you can remedy them, here.

If records aren’t cleaned frequently, all that unsavory material that builds up becomes embedded in the grooves of the record and gets harder to remove with the passage of time.

This in turn can lead to damage such as scratches, undesired crackle on records, and is a major cause of bad sounding playback on records. That’s just to name a few of the possible problems you’ll encounter if your records aren’t cleaned regularly.

Dirty records will also impact on your equipment, affecting the lifespan of your turntable stylus (as well as its performance).

How Often Should I Clean My Vinyl Records?

To keep vinyl records in optimum shape, you should give them a dry clean before and after each play with an anti-static record brush. This only takes a few seconds, but it will help to remove superficial dirt regularly, and prevent that debris from becoming embedded in the record’s grooves on a more permanent basis.

When it comes to a deeper clean, there are a couple of specific scenarios in which I give my records a more thorough clean with a dedicated cleaning solution, and these are:

  • Before a record’s first play. Regardless of whether it’s a brand-new disc fresh out of the sealed packaging or a second-hand purchase, it’s important to remove whatever may have made its way into the record’s grooves. Even new records pick up debris during the packing process.

In many cases a deep clean prior to first play will be the only time you ever need to really give the record such a detailed clean – if you then store the record correctly and give it a clean with an anti-static brush before and after each play, the need for a deep clean will be far less necessary.

  • When the record doesn’t sound (or look) good. Oftentimes you can hear when there’s more than just some superficial crackle on a record whilst playing, and there always comes a time when the dirt in the grooves gets too stubborn for the quick pre- and post-play brush to take care of. Sometimes you’ll also just be able to see that a record needs a good clean due to the state of the record’s playing surface.

Cleaning Your Records with Care: Important Things to Remember

Cleaning your vinyl records is only one part of the process in keeping them dirt-free and in top shape. There are a few other things you can do that, in tandem with a good cleaning routine, will help to keep them spotless and damage free.

Always Handle Vinyl Records with Great Care

Never touching the record’s playing surface is an audiophile mantra! Read more on how to handle records properly, and why it’s so important to keeping your collection preserved in our Complete Guide to Handling Vinyl Records (With Pictures).

Store Records Correctly and in Dedicated Inner and Outer Sleeves

Our guide to handling records touches on this, and it’s a definite piece in the puzzle of keeping records clean when not in use. First up, you can buy a set of anti-static inner sleeves as these help minimize static and keep records clean, and tend to be much better than the inners that records come in.

An outer sleeve will not only help keep the record jacket/artwork in great condition, but will also provide another layer of protection against dust, dirt etc when records are not in use.

And of course, storing records upright (never stacked!), in a low humidity environment that’s well ventilated, clean and away from direct sunlight helps them live longer and stay clean. Read more on storing records here.

Keep Your Record Playing Equipment Clean to Help Keep Your Records Clean

Ensuring your stylus, slip-mat and general record-playing equipment is clean is another way to help keep your records clean. A stylus will gather dirt over time, as it collects whatever debris may remain in records’ grooves, and it’ll then drag that through the grooves of other records and damage them.

Avoid Cleaning Records with Household Products

One final thing to always keep in mind when cleaning vinyl records is to avoid using anything corrosive or potentially damaging. That may seem like a no-brainer, but there’s a lot of information out there on the web about vinyl record cleaning “hacks” etc, some of which suggest using products such as Windex, vinegar, alcohol, wood glue and a whole host of other stuff. Do not use any of these!

Alcohol is used in some record cleaning solutions which are sold specifically for this purpose, but the concentration is low and it’s highly advisable to not try and mix up your own alcohol-based potion at home. Read more on the use of alcohol for cleaning vinyl records here.

Straight up soap and water is also touted by many as a cheap and fast way to clean records, and while this is probably the least harmful method compared to some of the more abrasive ones outlined as being a no-no above, it’s advisable to avoid as well.

Cleaning Vinyl Records: The Different Methods

The most effective, but also the costliest way of cleaning vinyl records is to use a vacuum cleaner. This is top-level record cleaning kit, but obviously get the very best results.

It’s all relative – if you have a large collection in which you’ve invested some serious time and money, then spending around $500 on a Pro-Ject – VC-E Record Cleaning Machine is a wise investment.

There are more affordable options, such as the Record Doctor vacuum cleaner, which at half the price is less fancy, but does a great job.

Vacuum cleaners will be a few levels above what a lot of people are prepared to invest in though, both in terms of money but also cleaning time.

Record washers are less expensive and don’t utilize as much technology as vacuum cleaners, but the price is much more palatable and the results are good. For well under $100 the Record Washer System by Spin-Clean will give records a deep-groove clean that makes a difference.

Cleaning records by hand will be the go-to method for most vinyl enthusiasts, and to be perfectly honest if you use a decent record-cleaning kit (incorporating an anti-static brush, specialized solution and microfiber cloth) and follow the below steps then cleaning by hand is more than sufficient for protecting your records.

A Good Vinyl Record Cleaning Kit is Essential for Cleaning Records by Hand

To clean records effectively by hand, I really recommend a good quality cleaning kit. It’ll set you back around $30, but it’s a worthy investment.

There are three kits I can recommend from personal experience: GrooveWasher, KAIU and Big Fudge.

The KAIU kit provides the best value for money, in my opinion, and comes with everything you need to give your records (and stylus) a thorough clean.

However, I’m happy recommending either of the three as they are all quality, and each offers something slightly different in terms of what it contains. Here’s a quick comparison to help you decide on which may be best for you, if you’re in need of a cleaning kit.

BrandWhat’s included in the kitLink to purchase
GrooveWasher> Handcrafted walnut handle
> Replaceable microfiber cleaning pad
> G2 record cleaning fluid
> Record label protector
KAIU> Anti-static record cleaning solution
> Stylus cleaner
> Carbon and velvet brushes
> Record label protector
> Microfiber cloth
Big Fudge> Velvet record brush
> Cleaning liquid
> Stylus brush
> Storage bag

How to Clean Vinyl Records: A Step-by-step Guide

Always make sure you’ve got clean hands and a clean surface (I always lay down a lint-free microfiber cloth on a flat surface) before you clean your records!

Step 1: Light Cleaning with an Anti-Static Record Brush

Place the record on the turntable and set it spinning. Take the anti-static brush and gently place the bristles on the record surface, making sure you’re holding the body of the brush and are not touching the bristles – this allows for the static removal.

You don’t want to be applying so much pressure that the bristles of the brush become squashed, flattened or misshapen, as this will only serve to push dirt etc further into the grooves. Just enough pressure should be applied so that the tips of the bristles are grazing the surface of the record and are able to run in the grooves – this pressure should be minimal.

Hold the brush in place for 3-4 revolutions of the record, and then scoop the brush up gently.

There are a number of different methods when it comes to what to do when the brush is in contact with the record surface. Some advocate for moving the brush from the outer edge of the record towards the inner edge, while others believe moving from inner to outer edge is the best way.

There is no right or wrong method. I prefer to avoid moving the brush across the grooves and keep it stationary for a few revolutions purely to avoid dragging any debris across the record surface and risk damaging/scratching it.

Step 2: Clean the Brush and Repeat

Most brushes (like the two in the image) come with a handle, which serves to both protect the bristles when not in use, but also help clean any dust/dirt collected without the need to touch the brush with your fingers.

Flipping the handle back and forth a few times over the bristles will help remove whatever the brush has collected, and you can then repeat the process of running the brush over the record’s surface.

  • This process of light cleaning is the one you should practice pre- and post-play each time you use a record.

Step 3: Apply the Record Cleaning Solution

Move the record from the turntable platter to a flat, clean surface such as a lint-free towel.

Protect the record label to ensure the solution doesn’t damage it, and then apply the solution by spraying it as evenly as possible across the surface of the record. Do this from a distance of about 6 inches (15cm), and no more than 5 sprays should be plentiful.

Leave the solution for a minute, maximum 2 minutes, to get to work.

Step 4: Wipe the Cleaning Solution Off the Record

Once the cleaning solution had had its chance to work away on the dirt, you can then take your microfiber cloth and gently wipe the record in a clockwise, circular motion.

If your cleaning kit has a velvet brush like the KAIU kit provides, you can use this before the microfiber cloth, to remove the bulk of the solution, and then use the cloth to remove any remaining traces.

Leave the record to dry for a couple of minutes. You may need to repeat steps 3 and 4 if the record is particularly dirty.

Step 5: Repeat the Process on the Other Side

Once the first side is dry, you can repeat the whole process on the other side.

Step 6: Repeat the Light Clean Process Before Storing the Record

Once both sides of the record have been deep cleaned, you can repeat steps 1 and 2 quickly on each side of the record to eliminate any static charge and superficial dust that may have already gravitated towards the record.

Doing this before you place the record in its inner sleeve and jacket is important to ensure that the record is being stored in as clean and dust-free a way as possible.

Record Skating: What It Is, Why It Happens, How To Fix It


If you’ve experienced an imbalance in sound when playing records, or have noticed excessive wear on your collection or stylus after a period of time, chances are that you’re stepping into the world of skating on vinyl records.

Skating on a turntable refers to the force created which pushes the tonearm towards the center of the platter. This is caused by the friction between the record surface and the stylus, and can be combatted with a counter force called anti-skate.

The importance and benefits of counteracting skate are numerous, both in terms of improvement and optimization of sound during playback, but also for taking good care of your records.

In this article we’ll cover exactly what skate on a turntable is and what causes it, what anti-skate is and how it works, and how you can ensure you are doing everything possible to minimize it and therefore preserve your records in their best possible condition.

What Is Skating On a Turntable and Why Does It Happen?

When a stylus settles into the record’s grooves, it needs to be as centered as possible in the groove and have the correct weight and pressure applied. This helps the stylus to track as “true” as possible, and thus keep the balance between the left and right channels.

This in turn helps to deliver the best possible sound, but also helps avoid damaging the record by applying too much pressure on either side of the groove or by pushing too hard vertically on the groove.

Things aren’t quite that simple though. When a record spins on a turntable platter and the stylus comes into contact with the record’s grooves, a force is created which draws the tonearm inwards and towards the center spindle of the platter.

As the stylus gets closer to the center of the record, the force becomes stronger. This is what’s known as skating, or record skate.

Skating means that achieving the ideal scenario becomes increasingly more difficult, because the inward force that’s generated applies an excess force to the inside wall of the record’s groove, and this leads to an imbalance in sound and excessive wear on the record.

What is Anti-Skate and Why Is It Important?

The need to counteract skate led to the development and implementation of anti-skate on turntables.

This function creates a counter-force to the natural tendency of the tonearm and attached cartridge and stylus to drift towards the center of the record.

Put simply, anti-skate helps to keep an equal force between the pull towards the inner edge of the record groove and the corrective pressure which needs to be applied to offset this.

Anti-skate is so important not just because of this balance in force, but because of the resulting effects it has.

Maintaining channel balance is a key factor. Unchecked, record skate would pull the stylus inwards (towards the center of the record), and would stress the inside wall of the record groove, which would place greater emphasis on the left channel. This would result in an imbalanced sound with too much left channel and not enough right.

For more on why your turntable may sound bad, and potential fixes, check out our guide here.

Another very important result of anti-skate is the job it does in helping to avoid unnecessary wear on both the record and the stylus.

If anti-skate isn’t set right, or isn’t applied at all, the inside of the record groove can experience excessive pressure, which wears it down rapidly and deteriorates the record. The impact on the stylus is equally damaging, so the cost can be high if anti-skate isn’t dialed in right.

When correctly set, anti-skate helps you to achieve great, balanced sound thanks to the stylus tracking the groove of the record at just the right angle and pressure. If anti-skate is off or not set, the stylus can pull, causing the kind of wear and damage outlined above, and it can also lead to the record skipping.

To make things even more delicate, too much anti-skate can also be detrimental! This leads to excess pressure on the stylus and record surface, will impede movement of the record while it spins, and will also cause damage to both the stylus and the record.

What Does The Anti-Skate Feature On a Turntable Do?

Anti-skate on a turntable is a feature which allows you to control the anti-skate force which is applied, in order to counteract the tendency for the tonearm to drift inwards.

Not all turntables have anti-skate control that is able to be manually controlled. Many record players and some turntables have an anti-skate mechanism built into the unit, and this is most common when the cartridge is integrated. The ability to manually control and fine-tune anti-skate is beneficial to both your equipment and records.

Anti-skate operates differently across various turntable manufacturers and models, and the manner in which it operates can range from a spring mechanism, to magnetic methods and counterweights, all of which can be adjustable.

When fighting the geometrical challenges thrown up by the various factors that cause skating, such as the offsets between the various elements central to the operation of the turntable (the tonearm, cartridge and the spinning record), the application of force by using weight is the key basis for controlling anti-skate.

Anti-skate works in conjunction with a few other features to achieve an all-round optimum sound.

The combination of the vertical tracking force (VTF), which determines how much weight is used to “push down” on the stylus to keep it weighted down into the grooves of the record, and the vertical tracking angle (VTA), which determines the angle at which the tonearm and stylus runs in relation to the record, work alongside anti-skate to balance all these requirements.

Anti-skate’s contribution, by controlling the lateral movement of the stylus through managing the horizontal force applied to the tonearm, helps to keep the stylus sitting perfectly in the groove of the record, with just the right amount of pressure applied from all sides to keep it in that sweet spot.

What If My Turntable Doesn’t Have Adjustable Anti-Skate?

If you have a turntable or record player that does not have an adjustable anti-skate setting, this means that the anti-skate comes pre-adjusted and is in-built.

The best way to ensure that the pre-set anti-skate is able to do its job effectively is by keeping your turntable on a level surface, and making sure that the tonearm is correctly balanced.

How To Set Anti-Skate: A Quick Step-by-Step Guide (With Pictures)

On turntables that have an adjustable anti-skate setting, it’s an easy and fast process with some simple steps.

1. Set Anti-Skate to 0

The first step is to set the anti-skate dial to 0, before doing anything.

2. Balance the Tonearm

The next step requires balancing of the tonearm. Hold the headshell while releasing the locking clamp which holds the tonearm in place. During this process, always take great care to avoid the stylus getting damaged by coming into contact with anything. The tonearm will bounce, so be extra alert!

Gently adjust the counterweight until the tonearm is balancing horizontally. It needs to hover just above the platter’s surface. Once set, don’t touch the counterweight while you return the tonearm to its rest and lock it in place.

3. Set the Vertical Tracking Force (VTF)

To set the VTF, you’ll need to spin the dial that is connected to the counterweight to 0, but you’ll need to do this in such a way that the dial moves independently of the counterweight.

Now that the counterweight is set to 0, you can adjust the counterweight to the recommended VTF by rotating the entire counterweight and dial as one.

Check the guidelines in your turntable’s instruction manual, as VTF can vary significantly even across the same brand’s range of models, depending on what cartridge is being used.

4. Set the Anti-Skate

Finally, you can now set the anti-skate dial to the recommended guidelines.

What Should I Set My Anti-Skate To?

As a rule of thumb, the anti-skate setting is often the same value as the VTF, but you should verify this according to the manufacturer guidelines for the specific turntable/cartridge brand.

Here’s a table that rounds up guidance on anti-skate setting values from some of the major turntable/cartridge manufacturers:

ManufacturerNotes on recommended anti-skate settingNotes on recommended VTF
ThorensSet to same value as VTF, “however, sometimes better sound quality can be achieved by using only 75 per cent of the value”“The cartridge manufacturer will have stated the ideal tracking force either on their website or in the setup instructions included with the cartridge… Forces of around 2 g or less serve as a good starting point”
Fluance“Set the anti-skating control value to match the recommended tracking force”“For OM10, the tracking force is 1.5g. For 2M Red and 2M Blue, it is 1.8g”
Sony“Set the anti-skating dial to the same setting as the tracking force scale ring. The numbers on the anti-skating dial correspond to 1g of tracking force”“When using the supplied cartridge (for the PS-LX350H turntable), turn the counterweight so that 2 reading lines up with the next index line. The supplied cartridge requires 2 grams of tracking force”
Denon“Make sure that the anti-skating value is the same as the stylus pressure value” – the VTF“Turn the counterweight in the direction of the arrow so that the ‘2’ mark of the stylus pressure adjustment ring is lined up with the line on the tone arm. The appropriate stylus pressure for the cartridge included with this unit (Denon DP-400) is 2.0 g (19.6 mN)”
Audio Technica“To set the anti-skate on a turntable that features a user-adjustable control, begin by adjusting it to the same value as the vertical tracking force (VTF) used – this will get you in the ballpark. Inner groove distortion in particular can be quite noticeable. Listen carefully to the last few minutes of a record to determine if more or less anti-skate is needed … determine if it appears to be louder on one channel, the left or the right. Adjust the anti-skate value until the distortion is minimized”“If you are working with the AT95E cartridge we recommend setting the force to 2 grams. If you ever install an alternate cartridge, you’ll need to adjust the tracking force according to the manufacturer’s recommended setting”
*Always refer to the cartridge and/or turntable manufacturer instructions for the specific VTF. The above are general guidelines taken from manufacturer websites and instruction manuals, and the VTF and relative anti-skate settings can vary across models within the same manufacturer’s range of products.

Turntable Vs Record Player: The Main Differences Explained


Something you’ve probably encountered when reading (or watching) content about records and the world of vinyl is the frequent use of the terms turntable and record player, but without much clarification around the differences between them.

Both terms are often used indiscriminately, and I’ve used them interchangeably on this blog when discussing various themes and topics. If you don’t know the difference between the two it’s easy to get confused, and to wonder whether there is any distinction at all.

A turntable comprises a platter, tonearm and cartridge, and operates as a standalone unit which requires additional components to play music. A record player is an all-in-one unit that does not need external components, as it already includes the turntable assembly, preamp, amplifier and speakers.

It’s also important to understand the nuances around the use of the term “turntable”, as it can be used to refer to a specific component of a record player, but has evolved in recent times to refer more often to the standalone unit that is hooked up to other equipment, either as part of a more elaborate stereo system, or as part of a DJ-style set-up.

There’s plenty to clarify and understand around the differences between a record player and turntable and the pros and cons, and that’s what we’ll address in detail in this article.

What Is a Turntable?

The term turntable can be used in two main contexts: to refer to an integral component of a record player, or as the name of a standalone unit.

As an element of a record player, it simply helps to form part of the overall unit. As a standalone, a turntable is combined with other equipment and external components to form a system, or set-up.

A turntable assembly in its purest sense is made up of a platter (upon which the record sits), a tonearm and a cartridge. In theory, a turntable is that simple: it’s just a combination of the most basic elements needed to enable a record to be spun and transfer the sound from its grooves to some form of output.

When referred to in the context of being standalone unit, a turntable will be made up of the platter, tonearm and cartridge mounted onto a base, or a plinth.

Most turntables will have a preamp built in, but will need an external amplifier and speakers, which need to be bought separately and connected to the turntable. The in-built preamp can often be bypassed, with a lot of users preferring to have an external preamp of their choosing.

Audiophiles and music enthusiasts who are really into achieving the best possible sound from a set-up will often mix and match the very best external components with their turntable, getting higher quality sound through the customization that this greater control over components allows.

For this reason, a turntable is often the preferred choice of audiophiles and record collectors.

In general, when you see or hear the term turntable being used it will mean the standalone unit, unless specifically referred to in the context of the make-up of a record player.

Understanding How a Turntable Works

Turntables are relatively simple pieces of equipment, and their mechanical operation is a straightforward process.

When the record is placed on the platter, it’s secured in place by the spindle and the slip-mat. These, in combination, help to avoid the record moving or sliding once the platter begins to rotate.

When the platter is in motion, the tonearm is then moved into place above the record, and gently lowered. This brings the stylus – the needle – into contact with the record’s surface.

The stylus is housed in the cartridge, which is connected to the end of the tonearm (find out more about tonearm assembly here).

When the stylus engages with the record surface, it settles into the grooves of the record. As it tracks those grooves it passes the vibrations to the cartridge, via the cantilever, and the cartridge then converts those movements into an electric signal thanks to the magnets and wire coils contained within.

The electric signal created is called a PHONO signal, which is too quiet to be heard at this stage of the process. This is where external components and equipment come into play with a turntable.

A lot of turntables have an in-built preamp, which converts this PHONO signal to a LINE signal before passing it along. However, many turntable users prefer to use an external preamp, and this is the point at which additional equipment comes into play.

Once the signal has been converted from PHONO to LINE, whether that’s via an internal or external preamp, the rest of the process happens away from the turntable. An amplifier will then take the signal and pass it to speakers, although some speakers have an amplifier built into them. This is where audiophiles and enthusiasts really get into fine-tuning their set-up to their specific demands.

With regards to the mechanics of a turntable, there are two main methods in which the platter is driven: direct-drive, or belt-drive.

Direct-drive turntables have a motor underneath the platter, which rotates the platter directly, whereas belt-drive turntables use a pulley system to connect the motor to the platter. You can find out more about how these operate here.

What Is a Record Player?

A record player is an all-in-one solution that contains all the components required to be able to play music from a record, without the need for any external components.

A turntable (in this context referred to as a component of the record player) with the parts as outlined in the previous section, along with an amplifier and speaker are all included in a record player. Often there’s no need for extra cables, external components or anything else – it’s a case of plug in and play.

Modern record players can also have other elements integrated into them, such as a radio, Bluetooth, USB connectivity and more. They’re also much more portable than a turntable, as newer models come in a suitcase-style format.

Understanding Some Important Differences of a Record Player Compared to a Turntable

The drawbacks with a record player often center on the lack of flexibility around upgrading components to improve sound. Record players are usually a much more affordable option, and as such the stock components they come fitted with can be of a much lower quality. This usually translates into poorer sound quality.

There is also often a lack of ability to fine tune things such as tracking force (the weight the stylus applies to the record surface) and the alignment of the cartridge. As well as affecting sound quality, the incapability to control these elements can lead to damage to records.

Turntable Vs Record Player: Which is Better? A Quick Sound Test

At home, we’ve got a few different options for playing records, from turntables with decent speaker set-ups, to a couple of record players we’ve acquired down the years.

For the purposes of a quick and easy (and very non-scientific!) test, I fixed up the most basic turntable arrangement alongside a cheap and basic record player, to try and create as equal and fair a direct comparison as possible.

Turntable set-upRecord Player set-up
> Audio Technica AT-LP120XUSB
> Marshall Stanmore speaker
> Crosley CR8005A-TU

The video plays the same 10-second intro on both set-ups back-to-back, to enable you to hear the differences in sound quality on the exact same section of music, and then switches back and forth between the two set-ups so that you can hear how the sound differs when listening continuously.

Those differences that you can quite clearly hear in sound quality, despite this quick test being run in an uncontrolled environment, can be explained when making a head-to-head comparison between turntables and record players in some key areas…

Turntable vs Record Player: A Head-to-head comparison

There are several areas in which direct comparisons can be made between record players and turntables, but there is also a certain degree of nuance to be accounted for depending on specific requirements an individual may have.

Components and Build Quality

Turntables tend to be of a higher quality, in terms of the build but also the components used. Higher quality parts result in a more durable and longer-lasting product.

The majority of modern record players cut corners on cost in the production process, and as a result are poorer quality. Cheap turntables are also available, and the low price will reflect the build quality, but in general turntables are better quality than record players.

The Actual Sound

Surely the most important element, right? You listen to vinyl because you want to appreciate all the nuanced delights that the format delivers.

This is an area where turntables will almost always win, hands down. The above video demo gives a fairly simple conclusion to this.

Turntables, with their higher quality components right out of the box, produce better sound. The endless possibilities for combining a turntable with external equipment of better quality, means there is a flexibility that turntables offer. You can buy a decent turntable for $250, for example, and pair it with a quality pair of speakers that you can then upgrade at any point.

A good entry-level turntable for a very reasonable price (around the $150 mark) is the Audio-Technica AT-LP60X-GM, which provides a reliable, well-built unit for an affordable amount.

With a record player, the options are extremely limited on this front, and you are usually stuck with what you get out of the box. Combine this with the fact that the in-built components of a record player, such as the speakers, are usually very low quality, the sound will be tinny and not deliver a pleasurable listening experience.

The Cost: You Get What You Pay For

Sure, a turntable will cost you more money and will require further expenditure on external components, but the long-term cost is worth it, as it’s more of an investment. Plus, you can spend what you can afford on a set of speakers, for example, and then upgrade at a later date because your turntable will stand the test of time.

Record players may be a cheaper option, but they are less durable, and they usually have a detrimental effect on records.

The Impact on Your Records

That leads us into another area that requires serious consideration: the wear and tear on your record collection.

A turntable, with its tonearm set at the correct tracking weight and quality stylus, will be far kinder to your records than a cheap record player’s stylus, which cannot have its tracking force adjusted and which will therefore cause damage to your records.

In my opinion, turntables win on every front, both in terms of the quality of listening experience (by a long shot!) but also for the long-term investment.